FRONT SEAT ASSEMBLY DISASSEMBLY
CAUTION / NOTICE / HINT
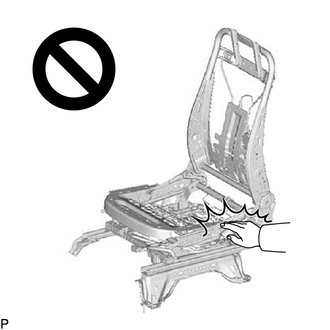
CAUTION:
-
Wear protective gloves. Sharp areas on the parts may injure your hands.
-
There is risk of injury.
Tech Tips
-
Use the same procedure for RHD and LHD vehicles.
-
The procedure listed below is for LHD vehicles.
-
Use the same procedure for the driver and front passenger side.
-
The procedure listed below is for the driver side.
PROCEDURE
-
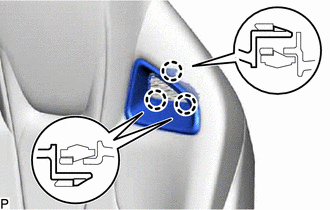
REMOVE SEAT POSITION AIRBAG SENSOR (for Driver Side)
-
REMOVE SEAT HEATER CONTROL SUB-ASSEMBLY (w/ Seat Heater System)
-
REMOVE FRONT SEAT INNER BELT ASSEMBLY LH (for Driver Side)
-
REMOVE FRONT SEAT INNER BELT ASSEMBLY RH (for Front Passenger Side)
-
REMOVE SEAT ADJUSTER COVER CAP
-
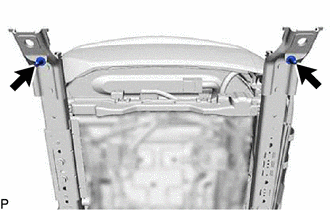
Remove the 2 seat adjuster cover caps.
-
-
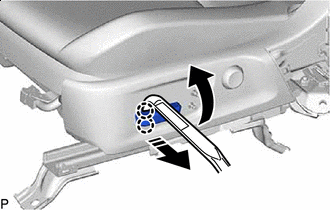
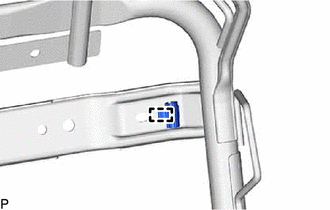
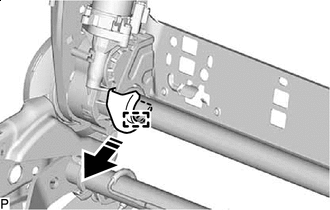
REMOVE FRONT INNER NO. 1 SEAT CUSHION SHIELD
-
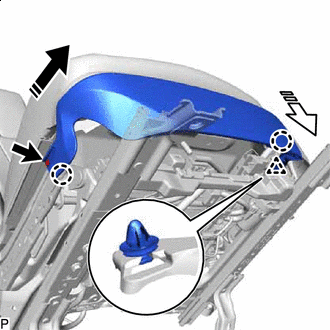

Remove in this direction (1) 
Remove in this direction (2) Remove the screw.
-
Pull in the direction indicated by the arrow (1) in the illustration to disengage the claw.
-
Pull in the direction indicated by the arrow (2) in the illustration and disengage the clip and guides to remove the front inner No. 1 seat cushion shield.
-
-
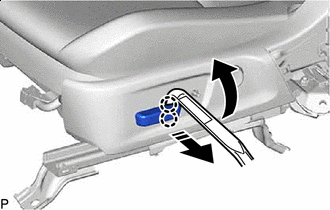
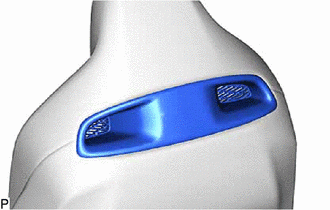
REMOVE RECLINING POWER SEAT SWITCH KNOB
-
Remove in this direction Using a moulding remover A, push in the direction indicated by the arrows in the illustration and disengage the claws to remove the reclining power seat switch knob.
-
-
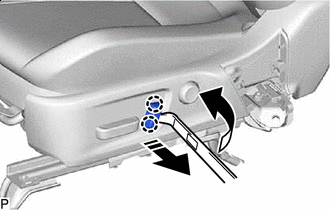
REMOVE SLIDE AND VERTICAL POWER SEAT SWITCH KNOB
-
Remove in this direction Using a moulding remover A, push in the direction indicated by the arrows in the illustration to disengage the claws.
-
Remove in this direction Using a moulding remover A, push in the direction indicated by the arrows in the illustration and disengage the claws to remove the slide and vertical power seat switch knob.
-
-
REMOVE FRONT SEAT CUSHION SHIELD
-
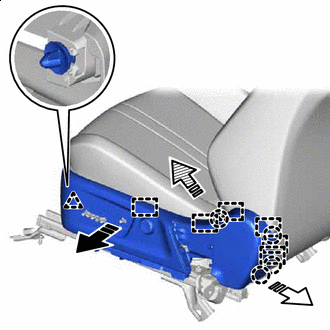
Remove in this direction (1) Remove in this direction (2) 
Remove in this direction (3) Pull in the direction indicated by the arrow (1) in the illustration to disengage the clip.
-
Pull in the direction indicated by the arrow (2) in the illustration to disengage the claws and guides.
-
Lift up in the direction indicated by the arrow (3) in the illustration and disengage the claw and guides to remove the front seat cushion shield.
-
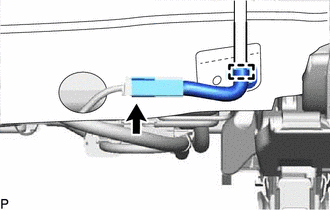
Disengage the claws to open the wire harness cover.
-
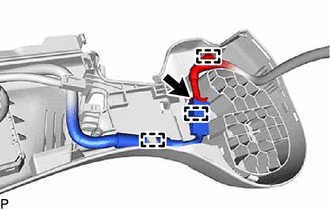
Disconnect the connector
-
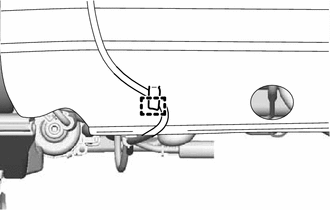
Disengage the clamps.
-
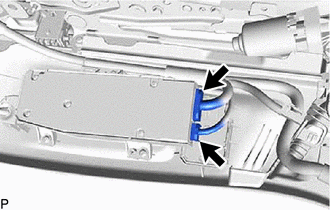
Disconnect the 2 connectors.
-
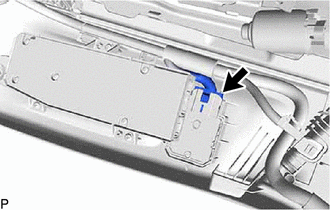
for Driver Side:
-
Disconnect the connector.
-
-
-
REMOVE POSITION CONTROL ECU AND SWITCH ASSEMBLY
-
REMOVE FRONT LUMBAR POWER SEAT SWITCH
-
REMOVE FRONT INNER SEAT CUSHION SHIELD
-

Remove in this direction Pull in the direction indicated by the arrow in the illustration and disengage the claws and guides to remove the front inner seat cushion shield.
-
-
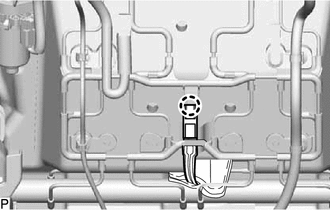
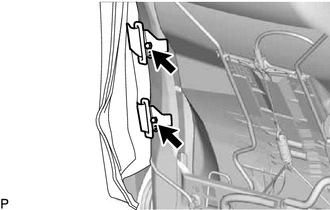
DISCONNECT FRONT SEATBACK PAD WITH COVER
-

Disengage the 2 hooks to disconnect the front seatback pad with cover.
-
Disengage the hook-and-loop fastener.
-
Disconnect the connector.
-
Disengage the clamp.
-
-
REMOVE FRONT SEAT CUSHION PAD WITH COVER
-
for Front Passenger Side:
-
Disengage the claw to separate the occupant detection sensor connector.
-
-
Disconnect the strap of the front seat cushion pad with cover.
-
Disengage the hooks to remove the front seat cushion pad with cover.
-
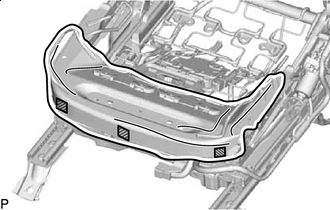

Double-sided Tape Peel off the double-sided tapes to remove the front seat cushion protector.
-
-
REMOVE NO. 2 FRONT SEAT SHOULDER BELT GUIDE
-
Disengage the claws to remove the No. 2 front seat shoulder belt guide.
-
-
REMOVE NO. 1 FRONT SEAT SHOULDER BELT GUIDE
Tech Tips
Use the same procedure as for the No. 2 front seat shoulder belt guide.
-
REMOVE NO. 3 FRONT SEAT SHOULDER BELT GUIDE
-
Remove the No. 3 front seat shoulder belt guide.
-
-
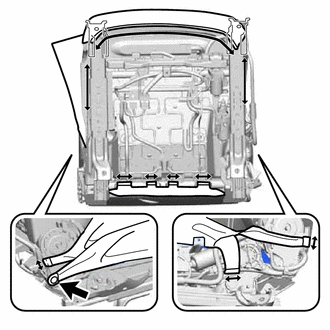
REMOVE FRONT SEATBACK PAD WITH COVER
-
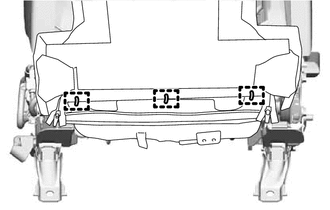
Remove the 3 hog rings.
-
Open the 2 fasteners.
-
Remove the 2 nuts to disconnect the 2 brackets.
-
w/ Climate Control Seat System:
-
Disengage the 2 claws to separate the seatback climate control blower from the front seatback pad with cover.
-
-
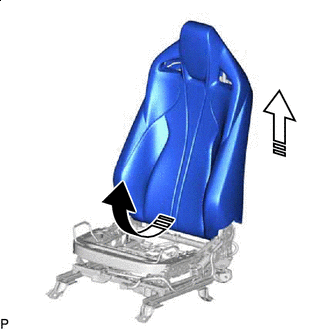
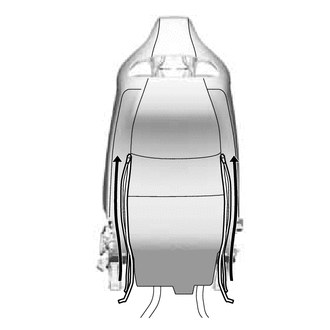
Remove in this direction (1) Remove in this direction (2) Pull out the rear end portion of the front seatback pad with cover in the direction indicated by the arrow (1) in the illustration.
-
Lift up in the direction indicated by the arrow (2) in the illustration to remove the front seatback pad with cover.
-
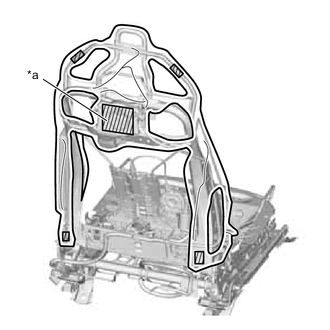
*a w/ Climate Control Seat System Only Double-sided Tape Peel off the double-sided tapes to remove the seatback protector.
-
-
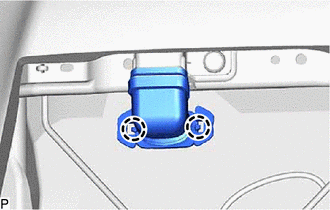
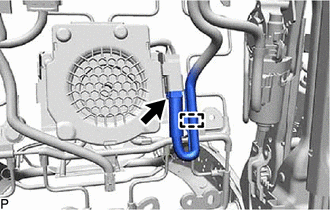
REMOVE SEATBACK CLIMATE CONTROL BLOWER (w/ Climate Control Seat System)
-
Disconnect the connector.
-
Disengage the clamps.
-
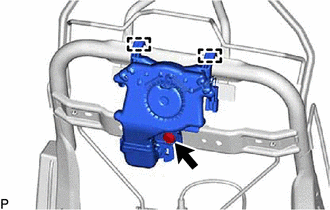
Remove the clip.
-
Disengage the guides to remove the seatback climate control blower.
-
-
REMOVE SEAT CUSHION CLIMATE CONTROL DUCT (w/ Climate Control Seat System)
-
Disengage the guides and claws to remove the seat cushion climate control duct.
-
-
REMOVE SEAT CUSHION CLIMATE CONTROL BRACKET (w/ Climate Control Seat System)
-
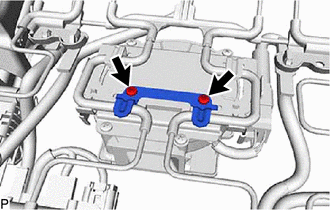
Remove the 2 screws and seat cushion climate control bracket.
-
-
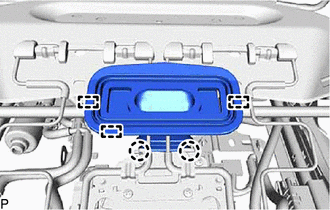
REMOVE SEAT CUSHION CLIMATE CONTROL BLOWER ASSEMBLY (w/ Climate Control Seat System)
-
Disconnect the connector.
-
Disengage the clamp.
-
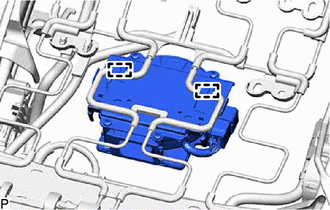
Disengage the hooks to remove the seat cushion climate control blower assembly.
-
-
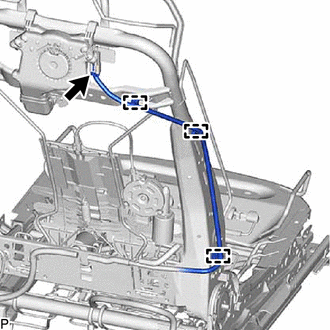
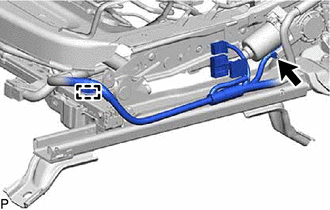
REMOVE FRONT NO. 2 SEAT WIRE
-
for Driver Side:
-
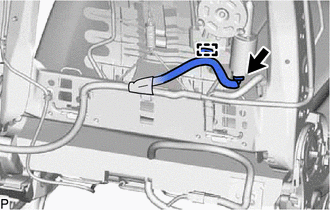
Disconnect the connector and disengage the clamp.
-
-

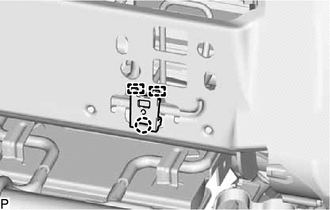
*a Guide *b Clamp Disconnect the connector.
-
Disengage the clamps and guide to remove the front No. 2 seat wire.
-
-
REMOVE FRONT SEAT AIRBAG ASSEMBLY
-
REMOVE LUMBAR SUPPORT ADJUSTER ASSEMBLY (for Driver Side)
-
Disengage the claw and guides to remove the front seatback edge protector.
Tech Tips
Use the same procedures as for the opposite side.
-

*a Guide *b Hook Remove in this direction (1) Remove in this direction (2) Pull in the direction indicated by the arrows (1) in the illustration to disengage the guides.
-
Pull in the direction indicated by the arrows (2) in the illustration and disengage the hooks to remove the lumbar support adjuster assembly.
-
-
REMOVE FRONT SEATBACK SPRING SUB-ASSEMBLY (for Front Passenger Side)
Tech Tips
Use the same procedure as for the driver side.
-
REMOVE FRONT SEATBACK HOOK
-
Disengage the clamp to remove the front seatback hook.
Tech Tips
Use the same procedures as for the opposite side.
-
-
REMOVE RECLINING ADJUSTER INSIDE COVER LH
-
Remove in this direction (1) Remove in this direction (2) Lift up in the direction indicated by the arrow (1) in the illustration to disengage the guide.
-
Pull in the direction indicated by the arrow (2) in the illustration and disengage the guide to remove the reclining adjuster inside cover LH.
-
-
REMOVE RECLINING ADJUSTER INSIDE COVER RH
Tech Tips
Use the same procedures as for the LH side.
-
REMOVE FRONT SEAT WIRE
-
Disconnect the connector.
-
Disengage the clamp.
-
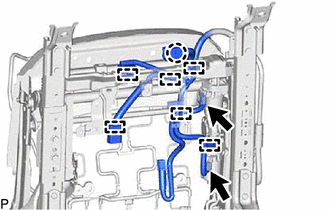
Disconnect the 2 connectors.
-
Disengage the claw and clamps to remove the front seat wire.
-
-
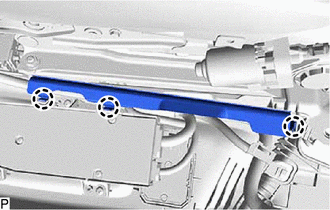
REMOVE FRONT SEATBACK FRAME SUB-ASSEMBLY
-
Remove in this direction Pull in the direction indicated by the arrow in the illustration and disengage the guide to remove the seat reclining adjuster inside cover.
-
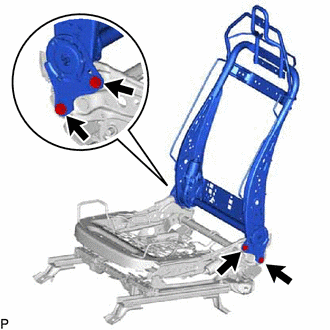
Remove the 4 bolts and front seatback frame sub-assembly.
-
-
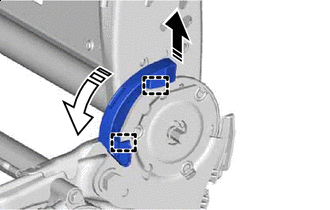
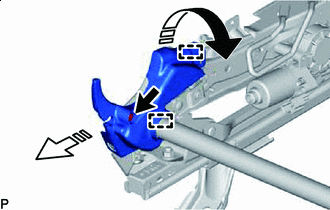
REMOVE FRONT SEAT CUSHION SPRING SUB-ASSEMBLY
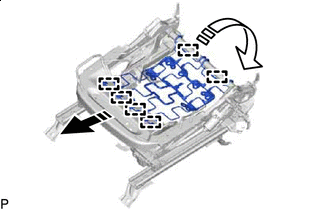
Remove in this direction (1) Remove in this direction (2)
-
Pull in the direction indicated by the arrow (1) in the illustration to disengage the hooks.
-
While rotating in the direction indicated by the arrow (2) in the illustration and disengage the hooks to remove the front seat cushion spring sub-assembly.
-
-
REMOVE FRONT LOWER SEAT CUSHION SHIELD LH
-
Remove in this direction Remove the clip.
-
Pull in the direction indicated by the arrow in the illustration to disengage the guide.
-
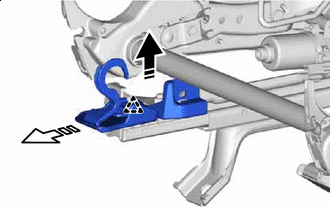
Remove in this direction (1) Remove in this direction (2) Pull in the direction indicated by the arrow (1) in the illustration to disengage the clip.
-
Pull in the direction indicated by the arrow (2) in the illustration to remove the front lower seat cushion shield LH.
-
-
REMOVE FRONT LOWER SEAT CUSHION SHIELD RH
-
Remove in this direction Remove the screw.
-
Pull in the direction indicated by the arrow in the illustration to disengage the guide.
-
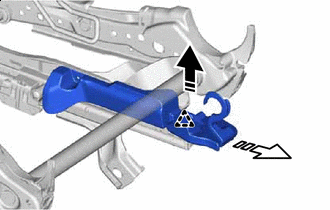
Remove in this direction (1) Remove in this direction (2) Pull in the direction indicated by the arrow (1) in the illustration to disengage the clip.
-
Pull in the direction indicated by the arrow (2) in the illustration to remove the front lower seat cushion shield RH.
-
-
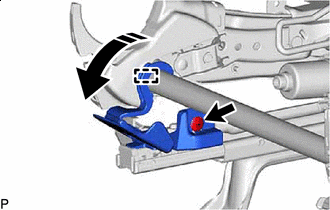
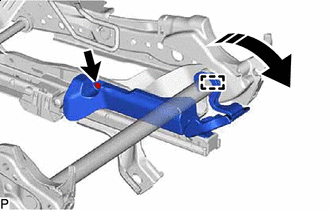
REMOVE FRONT SEAT CUSHION EDGE PROTECTOR
-
Remove in this direction (1) Remove in this direction (2) Remove the screw.
-
While rotating in the direction indicated by the arrow (1) in the illustration to disengage the guide.
-
Pull in the direction indicated by the arrow (2) in the illustration and disengage the guide to remove the front seat cushion edge protector.
-
-
REMOVE FRONT SEAT CUSHION EDGE PROTECTOR RH
Tech Tips
Use the same procedure as for the front seat cushion edge protector.