RADIO ANTENNA CORD REMOVAL
CAUTION / NOTICE / HINT
The necessary procedures (adjustment, calibration, initialization, or registration) that must be performed after parts are removed, installed, or replaced during the radio antenna cord removal/installation are shown below.
| Replacement Part or Procedure | Necessary Procedure | Effect/Inoperative when not Performed | Link |
|---|---|---|---|
| Disconnect cable from negative battery terminal | Correct the steering angle neutral point | Parking assist monitor system | |
| LKA / LDA system | |||
| Pre-crash safety system | |||
| Adaptive high beam system | |||
| Reset power trunk lid | Power trunk lid system |
PROCEDURE
-
REMOVE INSTRUMENT CENTER CLUSTER FINISH PANEL SUB-ASSEMBLY
-
REMOVE INSTRUMENT PANEL FINISH PANEL END RH
-
REMOVE INSTRUMENT PANEL FINISH PANEL END LH
-
REMOVE SHIFT LEVER KNOB SUB-ASSEMBLY
-
REMOVE CONSOLE UPPER PANEL SUB-ASSEMBLY
-
REMOVE INSTRUMENT PANEL CUP HOLDER ASSEMBLY
-
REMOVE RADIO RECEIVER ASSEMBLY WITH BRACKET
-
REMOVE ANTENNA CORD SUB-ASSEMBLY
-
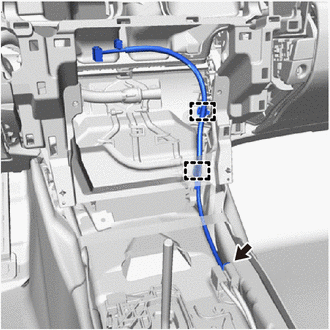
Disconnect the connector.
-
Disengage the clamps to remove the antenna cord sub-assembly.
-
-
REMOVE CONSOLE BOX ASSEMBLY
-
REMOVE FRONT SEAT ASSEMBLY RH
-
REMOVE REAR SEAT ASSEMBLY
-
REMOVE REAR DOOR SCUFF PLATE RH
-
REMOVE REAR SEAT SIDE GARNISH RH
-
REMOVE ROOF SIDE INNER GARNISH RH
Tech Tips
Use the same procedure as for the LH side.
w/ Rear Sunshade: Click here
w/o Rear Sunshade: Click here
-
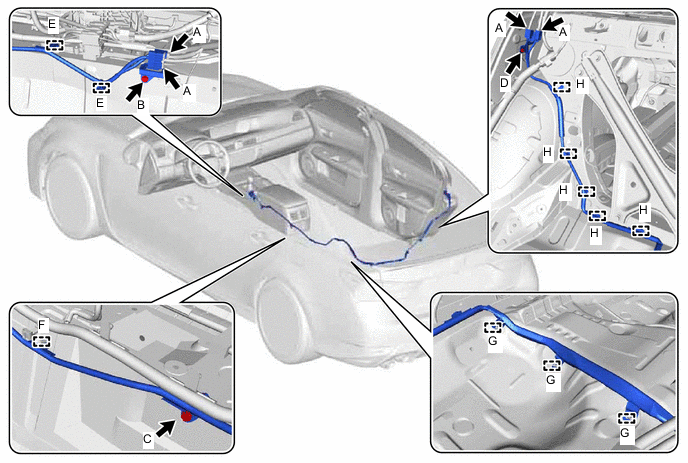
REMOVE NO. 2 ANTENNA CORD SUB-ASSEMBLY
-
Disconnect the 4 connectors labeled A.
-
Remove the bolt labeled B.
-
Remove the bolt labeled C.
-
Remove the bolt labeled D.
-
Disengage the clips labeled E.
-
Disengage the clamp labeled F.
-
Disengage the clamps labeled G from the floor stud bolts.
-
Disengage the clamps labeled H to remove the No. 2 antenna cord sub-assembly.
-
-
REMOVE ROOF HEADLINING
-
REMOVE NO. 3 ANTENNA CORD SUB-ASSEMBLY
-
Disconnect the 2 connectors.

-
Disengage the clamps to remove the No. 3 antenna cord sub-assembly.
-