REAR BRAKE REMOVAL

CAUTION / NOTICE / HINT
The necessary procedures (adjustment, calibration, initialization, or registration) that must be performed after parts are removed, installed, or replaced during the rear brake removal/installation are shown below.
| Replacement Part or Procedure | Necessary Procedure | Effect/Inoperative when not Performed | Link |
|---|---|---|---|
| Replacement, removal/installation of rear disc | Parking brake bedding | Electric parking brake system |
CAUTION / NOTICE / HINT
Tech Tips
-
Use the same procedure for the RH side and LH side.
-
The following procedure is for the LH side.
PROCEDURE
-
REMOVE REAR WHEEL
-
DRAIN BRAKE FLUID
Note
If brake fluid leaks onto any painted surface, immediately wash it off.
-
REMOVE REAR DISC BRAKE PAD
-
REMOVE REAR DISC BRAKE ANTI-SQUEAL SHIM KIT
-
DISCONNECT REAR FLEXIBLE HOSE
-
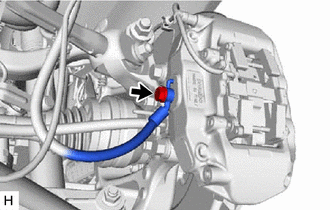
Remove the union bolt and gasket, and disconnect the rear flexible hose from the rear disc brake cylinder assembly.
-
-
REMOVE REAR DISC BRAKE CYLINDER ASSEMBLY
-
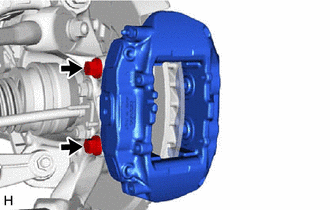
Remove the 2 bolts and rear disc brake cylinder assembly.
-
-
REMOVE PARKING BRAKE SHOE ADJUSTING HOLE PLUG
-
Remove the parking brake shoe adjusting hole plug.
-
-
REMOVE REAR DISC
-
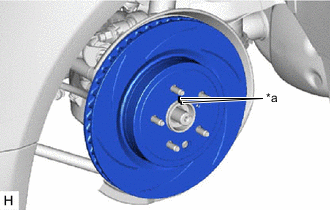
*a Matchmark Put matchmarks on the rear disc and the rear axle hub and bearing assembly.
-
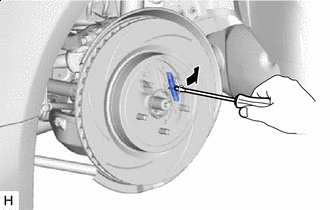

Contract Release the parking brake and remove the rear disc.
Tech Tips
If the rear disc cannot be removed easily, use a screwdriver to turn the shoe adjuster as shown in the illustration in order to contract the parking brake shoes.
-