YAW RATE AND ACCELERATION SENSOR REMOVAL
CAUTION / NOTICE / HINT
The necessary procedures (adjustment, calibration, initialization, or registration) that must be performed after parts are removed, installed, or replaced during the yaw rate and acceleration sensor (yaw rate sensor) removal/installation are shown below.
| Replacement Part or Procedure | Necessary Procedure | Effect/Inoperative when not Performed | Link |
|---|---|---|---|
| Disconnect cable from negative battery terminal | Memorize steering angle neutral point | Parking assist monitor system | |
| Lane departure alert system (w/ Steering Control) | |||
| Pre-crash safety system | |||
| Adaptive high beam system | |||
| Reset power trunk lid | Power trunk lid system | ||
| Replacement of yaw rate and acceleration sensor (yaw rate sensor) |
|
|
PROCEDURE
-
DISCONNECT CABLE FROM NEGATIVE BATTERY TERMINAL
Note
When disconnecting the cable, some systems need to be initialized after the cable is reconnected.
-
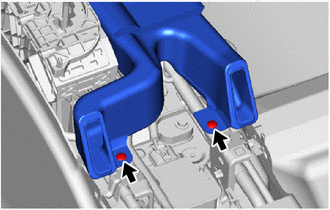
REMOVE NO. 1 INDOOR ELECTRICAL KEY ANTENNA ASSEMBLY
-
REMOVE YAW RATE AND ACCELERATION SENSOR (YAW RATE SENSOR)
-
Remove the 2 clips to separate the No. 1 console box duct.
-
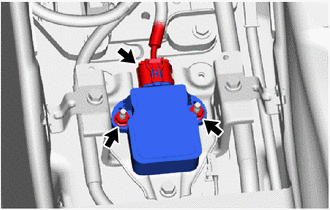
Disconnect the connector from the yaw rate and acceleration sensor (yaw rate sensor).
-
Remove the 2 nuts and yaw rate and acceleration sensor (yaw rate sensor).
Note
-
Do not drop the yaw rate and acceleration sensor (yaw rate sensor).
-
If the yaw rate and acceleration sensor (yaw rate sensor) is dropped, replace it with a new one.
-
-
-
REMOVE NO. 1 CONSOLE BOX MOUNTING BRACKET
-
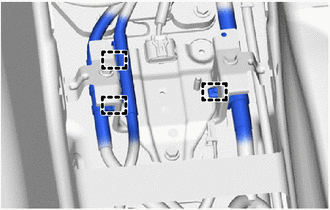
Disengage the 3 clamps to separate the wire harness from the No. 1 console box mounting bracket.
-
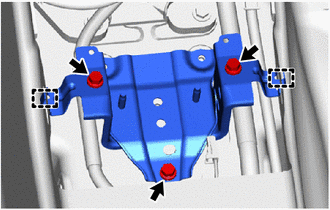
Remove the 3 bolts.
-
Disengage the 2 hooks to remove the No. 1 console box mounting bracket.
-