FRONT CRANKSHAFT OIL SEAL REMOVAL

PROCEDURE
-
REMOVE V-BANK COVER SUB-ASSEMBLY
-
REMOVE COOL AIR INTAKE DUCT SEAL
-
DISCONNECT VENTILATION HOSE
-
REMOVE AIR CLEANER CAP WITH AIR CLEANER HOSE
-
REMOVE RADIATOR RESERVE TANK ASSEMBLY
-
REMOVE NO. 1 ENGINE UNDER COVER ASSEMBLY
-
REMOVE FAN AND GENERATOR V BELT
-
REMOVE CRANKSHAFT PULLEY
-
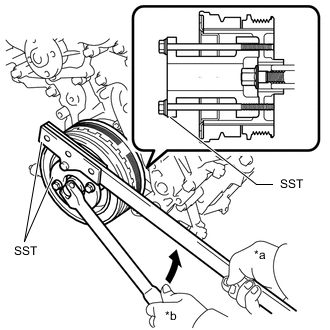
*a Hold *b Turn Using SST, hold the crankshaft pulley and loosen the crankshaft pulley set bolt until only 2 or 3 threads are screwed into the crankshaft.
- SST
- 09213-38010 ( 09214-00011 )
- 09330-00021
-
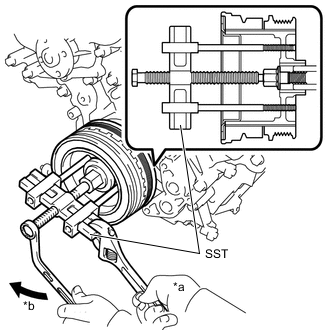
*a Hold *b Turn Using SST, remove the crankshaft pulley set bolt and crankshaft pulley.
- SST
- 09950-50013 ( 09951-05010, 09952-05010, 09953-05010, 09954-05021 )
Tech Tips
Apply lubricant to the threads and tip of SST (center bolt) prior to use.
-
-
REMOVE CRANKSHAFT TIMING GEAR KEY
-
Using a screwdriver, remove the crankshaft timing gear key from the crankshaft groove.
Tech Tips
Tape the screwdriver tip before use.
-
-
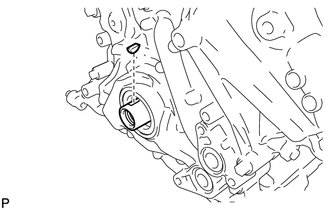
REMOVE TIMING GEAR CASE OR TIMING CHAIN CASE OIL SEAL
-
Using a knife, cut through the lip of the timing gear case or timing chain case oil seal.
-
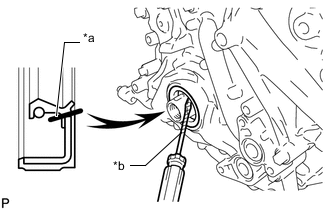
*a Cut Position *b Protective Tape Using a screwdriver, pry out the timing gear case or timing chain case oil seal.
Note
After the removal, check the crankshaft for damage.
If it is damaged, smooth the surface with 400-grit sandpaper.
Tech Tips
Tape the screwdriver tip before use.
-