ECM INSTALLATION
PROCEDURE
-
INSTALL NO. 2 ECM BRACKET
-
Install the No. 2 ECM bracket to the ECM with the 2 screws.
- Torque:
- 4.5 N*m { 46 kgf*cm, 40 in.*lbf }
-
-
INSTALL NO. 1 ECM BRACKET
-
Install the No. 1 ECM bracket to the ECM with the 2 screws.
- Torque:
- 4.5 N*m { 46 kgf*cm, 40 in.*lbf }
-
-
INSTALL ECM
Tech Tips
Perform "Vehicle Identification Number (VIN) or frame number registration" after replacing the ECM.
-
w/ Canister Pump Module:
-
w/o Canister Pump Module:
-
Install the ECM to the engine room ECU box with the 2 nuts.
- Torque:
- 5.5 N*m { 56 kgf*cm, 49 in.*lbf }
Note
-
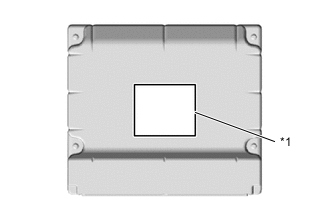
*1 Name Plate Install the ECM to the engine room ECU box with the name plate facing the outside of the vehicle.
-
If the ECM has been struck or dropped, replace it.
-
-
INSTALL WIRE HARNESS
-
Install the wire harness to the engine room ECU box.
-
Install the wire harness clamp.
-
Connect the transmission control ECU assembly connector.
-
Engage the wire harness to the engine room ECU box and connect the 6 ECM connectors.
Note
-
When connecting the connectors, make sure that dirt, water or other foreign matter does not become stuck between the connectors and other part.
-
Be sure to securely connect the ECM connectors.
-
-
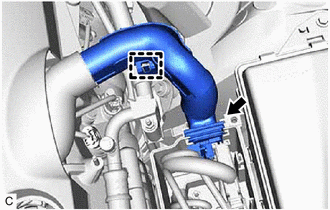
Engage the guide and connect the connector holder to the engine room ECU box.
-
Engage the claw.
-
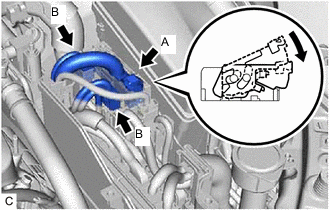
Connect the 2 engine wire harness connectors (B).
-
Connect the engine wire harness connector (A) (with lock) to the engine room ECU box and move the lock lever to engage the lock of each connector (with lock) as shown in the illustration.
Note
Securely connect the connectors (with lock) to the engine room ECU box and engage the lock.
-
-
INSTALL ENGINE ROOM ECU COVER
-
Install the engine room ECU cover with the 3 bolts.
- Torque:
- 5.5 N*m { 56 kgf*cm, 49 in.*lbf }
Note
Make sure that the wire harness does not get caught between the parts.
-
-
INSTALL COOL AIR INTAKE DUCT SEAL
-
CONNECT CABLE TO NEGATIVE BATTERY TERMINAL
Note
When disconnecting the cable, some systems need to be initialized after the cable is reconnected.
-
PERFORM INITIALIZATION
Perform "Vehicle Identification Number (VIN) or frame number registration" after replacing the ECM.
-
w/ Canister Pump Module:
-
w/o Canister Pump Module:
-