EXHAUST PIPE REMOVAL
CAUTION / NOTICE / HINT
The necessary procedures (adjustment, calibration, initialization, or registration) that must be performed after parts are removed, installed, or replaced during the front exhaust pipe assembly and tail exhaust pipe assembly removal/installation are shown below.
| Replacement Part or Procedure | Necessary Procedure | Effect/Inoperative when not Performed | Link |
|---|---|---|---|
| Exhaust system gas leak repair | Inspection After Repair (Learning Value Reset and Idle Learning) | Poor idling, starting problems, etc. may occur when learning is not completed. |
|
CAUTION:
-
When the engine is hot, do not touch high-temperature areas such as the engine or exhaust pipe.
-
Touching high-temperature areas such as the engine and exhaust pipe could result in burns.
PROCEDURE
-
REMOVE FRONT CENTER FLOOR COVER LH
-
REMOVE FRONT CENTER FLOOR COVER RH
-
REMOVE FRONT CENTER FLOOR BRACE
-
REMOVE HEATED OXYGEN SENSOR
-
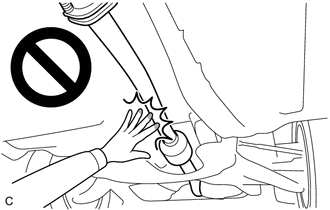
REMOVE FRONT EXHAUST PIPE ASSEMBLY (TWC: Rear Catalyst)
-
Remove the 4 bolts and 4 nuts to disconnect the front exhaust pipe assembly (TWC: Rear Catalyst).
-
Remove the 4 bolts, 4 compression springs and front exhaust pipe assembly (TWC: Rear Catalyst).
-
Remove the 4 exhaust pipe gaskets from the front exhaust pipe assembly (TWC: Rear Catalyst).
-
-
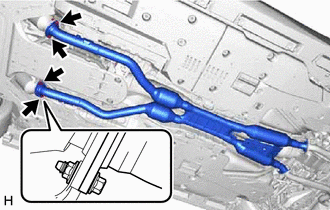
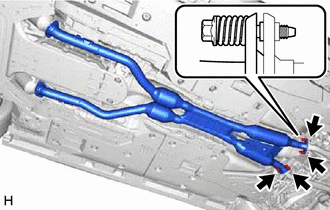
DISCONNECT TAIL EXHAUST PIPE LH
-
Disconnect the tail exhaust pipe LH from the 3 exhaust pipe supports.
Note
Protect the rear bumper assembly using protection material such as a piece of cloth to avoid damage by the tail exhaust pipe baffle sub-assemblies.
-
-
DISCONNECT TAIL EXHAUST PIPE ASSEMBLY
-

Disconnect the tail exhaust pipe assembly from the 3 exhaust pipe supports.
Note
Protect the rear bumper assembly using protection material such as a piece of cloth to avoid damage by the tail exhaust pipe baffle sub-assemblies.
-
-
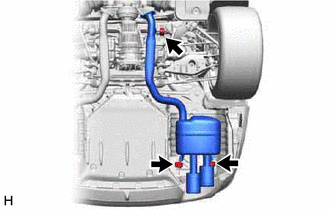
REMOVE TAIL EXHAUST PIPE BAFFLE SUB-ASSEMBLY
Tech Tips
-
Perform this procedure only when replacement of the tail exhaust pipe baffle sub-assembly is necessary.
-
If the tail exhaust pipe baffle sub-assembly is removed, replace it with a new one.
-
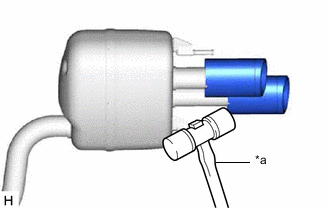
*a Plastic Hammer Using a plastic hammer, remove the 4 tail exhaust pipe baffle sub-assemblies from the tail exhaust pipe assembly and tail exhaust pipe LH.
-