BACK DOOR OUTSIDE GARNISH REASSEMBLY
Info Added 2017-10-06 ![]()
PROCEDURE
-
INSTALL NO. 1 BACK DOOR EMBLEM
-
INSTALL NO. 3 BACK DOOR NAME PLATE
-
INSTALL NO. 2 BACK DOOR NAME PLATE
-
INSTALL NO. 1 BACK DOOR NAME PLATE
-
INSTALL BACK DOOR OUTSIDE GARNISH SEAL
Tech Tips
-
Using the same procedure, install every back door outside garnish seal.
-
When installing the back door outside garnish seal, heat the back door outside garnish using a heat light.
Heating Temperature Item Temperature Back Door Outside Garnish 20 to 30°C (68 to 86°F) Note
Do not heat the back door outside garnish excessively.
-
Clean the back door outside garnish surface.
-
Using a heat light, heat the back door outside garnish surface.
-
Remove the double-sided tape from the back door outside garnish.
-
Wipe off any tape adhesive residue with cleaner.
-
-
Using a heat light, heat the back door outside garnish.
-
Remove the release paper from a new back door outside garnish seal.
Tech Tips
After removing the release paper, keep the exposed adhesive free from foreign matter.
-
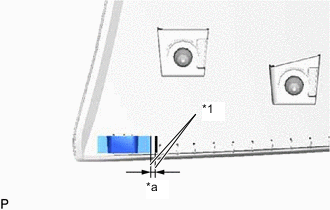
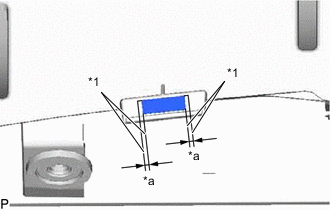
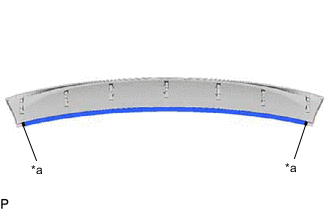
*1 Mark-off Line *a 1.5 mm (0.05905 in.) Install the back door outside garnish seal as shown in the illustration.
Tech Tips
Align the back door outside garnish seal with the mark-off line of the back door outside garnish.
-
-
INSTALL BACK DOOR GARNISH MOULDING LOWER PROTECTOR
Tech Tips
-
Using the same procedure, install every back door garnish moulding lower protector.
-
When installing the back door garnish moulding lower protector, heat the back door outside garnish using a heat light.
Heating Temperature Item Temperature Back Door Outside Garnish 20 to 30°C (68 to 86°F) Note
Do not heat the back door outside garnish excessively.
-
Clean the back door outside garnish surface.
-
Using a heat light, heat the back door outside garnish surface.
-
Remove the double-sided tape from the back door outside garnish.
-
Wipe off any tape adhesive residue with cleaner.
-
-
Using a heat light, heat the back door outside garnish.
-
Remove the release paper from a new back door garnish moulding lower protector.
Tech Tips
After removing the release paper, keep the exposed adhesive free from foreign matter.
-
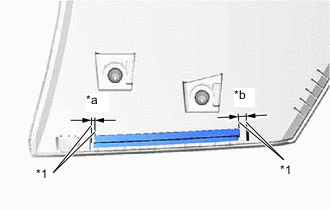
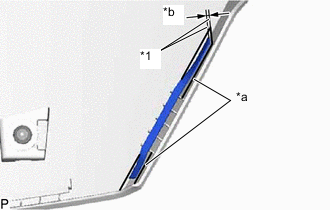
*1 Mark-off Line *a 1.0 mm (0.0393 in.) *b 5.0 mm (0.196 in.) Install the back door garnish moulding lower protector as shown in the illustration.
Tech Tips
Align the back door garnish moulding lower protector with the mark-off line of the back door outside garnish.
-
-
INSTALL NO. 2 BACK DOOR OUTSIDE GARNISH PROTECTOR
Tech Tips
-
Using the same procedure, install every No. 2 back door outside garnish protector.
-
When installing the No. 2 back door outside garnish protector, heat the back door outside garnish using a heat light.
Heating Temperature Item Temperature Back Door Outside Garnish 20 to 30°C (68 to 86°F) Note
Do not heat the back door outside garnish excessively.
-
Clean the back door outside garnish surface.
-
Using a heat light, heat the back door outside garnish surface.
-
Remove the double-sided tape from the back door outside garnish.
-
Wipe off any tape adhesive residue with cleaner.
-
-
Using a heat light, heat the back door outside garnish.
-
Remove the release paper from a new No. 2 back door outside garnish protector.
Tech Tips
After removing the release paper, keep the exposed adhesive free from foreign matter.
-
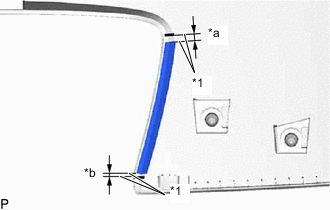
*1 Mark-off Line *a 5.0 mm (0.196 in.) *b 1.0 mm (0.0393 in.) Install the No. 2 back door outside garnish protector as shown in the illustration.
Tech Tips
Align the No. 2 back door outside garnish protector with the mark-off line of the back door outside garnish.
-
-
INSTALL BACK DOOR OUTSIDE GARNISH PAD
Tech Tips
-
Using the same procedure, install every back door outside garnish pad.
-
When installing the back door outside garnish pad, heat the back door outside garnish using a heat light.
Heating Temperature Item Temperature Back Door Outside Garnish 20 to 30°C (68 to 86°F) Note
Do not heat the back door outside garnish excessively.
-
Clean the back door outside garnish surface.
-
Using a heat light, heat the back door outside garnish surface.
-
Remove the double-sided tape from the back door outside garnish.
-
Wipe off any tape adhesive residue with cleaner.
-
-
Using a heat light, heat the back door outside garnish.
-
Remove the release paper from a new back door outside garnish pad.
Tech Tips
After removing the release paper, keep the exposed adhesive free from foreign matter.
-
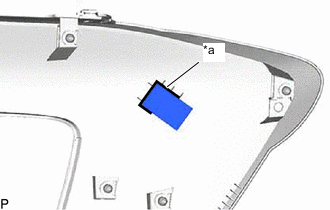
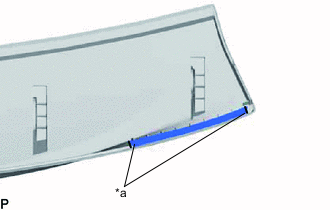
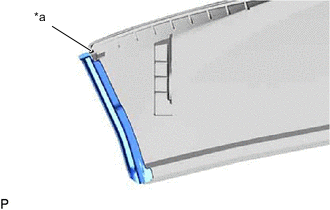
*a Line Install the back door outside garnish pad as shown in the illustration.
Tech Tips
Install each back door outside garnish pad along the line on the back door outside garnish.
-
-
INSTALL NO. 1 BACK DOOR OUTSIDE GARNISH PROTECTOR
Tech Tips
-
Using the same procedure, install every No. 1 back door outside garnish protector.
-
When installing the No. 1 back door outside garnish protector, heat the back door outside garnish using a heat light.
Heating Temperature Item Temperature Back Door Outside Garnish 20 to 30°C (68 to 86°F) Note
Do not heat the back door outside garnish excessively.
-
Clean the back door outside garnish surface.
-
Using a heat light, heat the back door outside garnish surface.
-
Remove the double-sided tape from the back door outside garnish.
-
Wipe off any tape adhesive residue with cleaner.
-
-
Using a heat light, heat the back door outside garnish.
-
Remove the release paper from a new No. 1 back door outside garnish protector.
Tech Tips
After removing the release paper, keep the exposed adhesive free from foreign matter.
-
*1 Mark-off Line *a 1.5 mm (0.05905 in.) Install the No. 1 back door outside garnish protector as shown in the illustration.
Tech Tips
Align the No. 1 back door outside garnish protector with the mark-off line of the back door outside garnish.
-
-
INSTALL BACK DOOR GARNISH MOULDING PROTECTOR LH
Tech Tips
When installing the back door garnish moulding protector LH, heat the back door outside garnish and No. 2 back door outside garnish using a heat light.
Heating Temperature Item Temperature Back Door Outside Garnish and No. 2 Back Door Outside Garnish 20 to 30°C (68 to 86°F) Note
Do not heat the back door outside garnish and No. 2 back door outside garnish excessively.
-
for Back Door Outside Garnish Side:
-
Clean the back door outside garnish surface.
-
Using a heat light, heat the back door outside garnish surface.
-
Remove the double-sided tape from the back door outside garnish.
-
Wipe off any tape adhesive residue with cleaner.
-
-
Using a heat light, heat the back door outside garnish.
-
Remove the release paper from a new back door garnish moulding protector LH.
Tech Tips
After removing the release paper, keep the exposed adhesive free from foreign matter.
-
*1 Mark-off Line *a Line *b 1.0 mm (0.0393 in.) Install the back door garnish moulding protector LH as shown in the illustration.
Tech Tips
Align the back door garnish moulding protector LH with the mark-off line of the back door outside garnish
-
-
for No. 2 Back Door Outside Garnish Side:
-
Clean the No. 2 back door outside garnish surface.
-
Using a heat light, heat the No. 2 back door outside garnish surface.
-
Remove the double-sided tape from the No. 2 back door outside garnish.
-
Wipe off any tape adhesive residue with cleaner.
-
-
Using a heat light, heat the No. 2 back door outside garnish.
-
Remove the release paper from a new back door garnish moulding protector LH.
Tech Tips
After removing the release paper, keep the exposed adhesive free from foreign matter.
-
*a Line Install the back door garnish moulding protector LH as shown in the illustration.
Tech Tips
Install each back door garnish moulding protector LH along the line on the No. 2 back door outside garnish.
-
-
-
INSTALL BACK DOOR GARNISH MOULDING PROTECTOR RH
Tech Tips
Use the same procedure as for the LH side.
-
INSTALL BACK DOOR GARNISH MOULDING UPPER PROTECTOR
Tech Tips
When installing the back door garnish moulding upper protector, heat the No. 2 back door outside garnish using a heat light.
Heating Temperature Item Temperature No. 2 Back Door Outside Garnish 20 to 30°C (68 to 86°F) Note
Do not heat the No. 2 back door outside garnish excessively.
-
Clean the No. 2 back door outside garnish surface.
-
Using a heat light, heat the No. 2 back door outside garnish surface.
-
Remove the double-sided tape from the No. 2 back door outside garnish.
-
Wipe off any tape adhesive residue with cleaner.
-
-
Using a heat light, heat the No. 2 back door outside garnish.
-
Remove the release paper from a new back door garnish moulding upper protector.
Tech Tips
After removing the release paper, keep the exposed adhesive free from foreign matter.
-
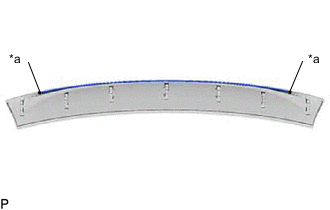
*a Line Install the back door garnish moulding upper protector as shown in the illustration.
Tech Tips
Install each back door garnish moulding upper protector along the line on the No. 2 back door outside garnish.
-
-
INSTALL BACK DOOR OUTSIDE GARNISH PROTECTOR
Tech Tips
When installing the back door outside garnish protector, heat the No. 2 back door outside garnish using a heat light.
Heating Temperature Item Temperature No. 2 Back Door Outside Garnish 20 to 30°C (68 to 86°F) Note
Do not heat the No. 2 back door outside garnish excessively.
-
Clean the No. 2 back door outside garnish surface.
-
Using a heat light, heat the No. 2 back door outside garnish surface.
-
Remove the double-sided tape from the No. 2 back door outside garnish.
-
Wipe off any tape adhesive residue with cleaner.
-
-
Using a heat light, heat the No. 2 back door outside garnish.
-
Remove the release paper from a new back door outside garnish protector.
Tech Tips
After removing the release paper, keep the exposed adhesive free from foreign matter.
-
*a Line Install the back door outside garnish protector as shown in the illustration.
Tech Tips
Install each back door outside garnish protector along the line on the No. 2 back door outside garnish.
-
-
INSTALL BACK DOOR GARNISH SIDE PROTECTOR LH
Tech Tips
When installing the back door garnish side protector LH, heat the No. 2 back door outside garnish using a heat light.
Heating Temperature Item Temperature Back Door Outside Garnish 20 to 30°C (68 to 86°F) Note
Do not heat the No. 2 back door outside garnish excessively.
-
Clean the No. 2 back door outside garnish surface.
-
Using a heat light, heat the No. 2 back door outside garnish surface.
-
Remove the double-sided tape from the No. 2 back door outside garnish.
-
Wipe off any tape adhesive residue with cleaner.
-
-
Using a heat light, heat the No. 2 back door outside garnish.
-
Remove the release paper from a new back door garnish side protector LH.
Tech Tips
After removing the release paper, keep the exposed adhesive free from foreign matter.
-
*a Line Install the back door garnish side protector LH as shown in the illustration.
Tech Tips
Install each back door garnish side protector LH along the line on the No. 2 back door outside garnish.
-
-
INSTALL BACK DOOR GARNISH SIDE PROTECTOR RH
Tech Tips
Use the same procedure as for the LH side.
-
INSTALL NO. 2 BACK DOOR OUTSIDE GARNISH
-
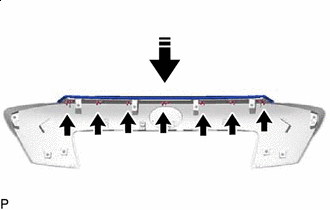

Install in this Direction Install the No. 2 back door outside garnish and 7 No. 1 outside moulding retainers as shown in the illustration.
-