NAME PLATE INSTALLATION
CAUTION / NOTICE / HINT
Tech Tips
When installing the name plates, heat the vehicle body, back door outside garnish and name plates using a heat light.
| Item | Temperature |
|---|---|
| Vehicle Body | 40 to 60°C (104 to 140°F) |
|
20 to 30°C (68 to 86°F) |
CAUTION:
-
Do not touch the heat light and heated parts, touching the heat light may result in burns.
-
Touching heated parts for a long time may result in burns.

| *a | Heated Part |
| *b | Heat Light |
Note
Do not heat the vehicle body, back door outside garnish or name plate excessively.
PROCEDURE
-
INSTALL NO. 3 BACK DOOR NAME PLATE
-
Clean the back door outside garnish surface.
-
Using a heat light, heat the back door outside garnish surface.
-
Remove any remaining double-sided tape from the back door outside garnish.
-
Wipe off any tape adhesive residue with cleaner.
-
-
Using a heat light, heat the back door outside garnish and a new No. 3 back door name plate.
-
Remove the release paper from the No. 3 back door name plate.
Tech Tips
After removing the release paper, keep the exposed adhesive free from foreign matter.
-
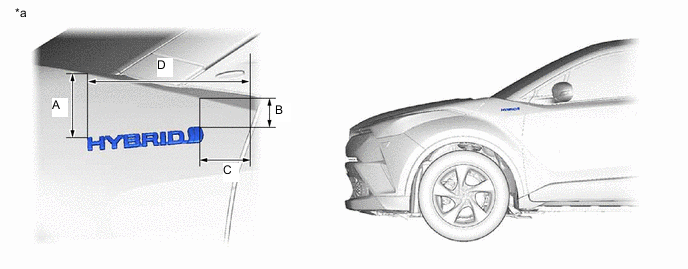
Install the No. 3 back door name plate as shown in the illustration.

*a Reference Values - - Standard Measurement Area Measurement Area Measurement A 115.8 mm (4.56 in.) B 78.9 mm (3.106 in.) C 74.3 mm (2.93 in.) D 191.4 mm (7.54 in.)
-
-
INSTALL SIDE PANEL EMBLEM
-
Clean the vehicle body surface.
-
Using a heat light, heat the vehicle body surface.
-
Remove any remaining double-sided tape from the vehicle body.
-
Wipe off any tape adhesive residue with cleaner.
-
-
Using a heat light, heat the vehicle body and a new side panel emblem.
-
Remove the release paper from the side panel emblem.
Tech Tips
After removing the release paper, keep the exposed adhesive free from foreign matter.
-
for LH Side:
-
Install the side panel emblem as shown in the illustration.
*a Reference Values - - Standard Measurement Area Measurement Area Measurement A 85.5 mm (3.37 in.) B 42.8 mm (1.69 in.) C 62.6 mm (2.46 in.) D 195.5 mm (7.70 in.)
-
-
for RH Side:
-
Install the side panel emblem as shown in the illustration.

*a Reference Values - - Standard Measurement Area Measurement Area Measurement A 90.6 mm (3.57 in.) B 45.9 mm (1.807 in.) C 55.8 mm (2.20 in.) D 190.4 mm (7.50 in.)
-
-
-
INSTALL NO. 1 BACK DOOR EMBLEM
-
Clean the back door outside garnish surface.
-
Using a heat light, heat the back door outside garnish surface.
-
Remove any remaining double-sided tape from the back door outside garnish.
-
Wipe off any tape adhesive residue with cleaner.
-
-
Using a heat light, heat the back door outside garnish and a new No. 1 back door emblem.
-
Remove the release paper from the No. 1 back door emblem.
Tech Tips
After removing the release paper, keep the exposed adhesive free from foreign matter.
-
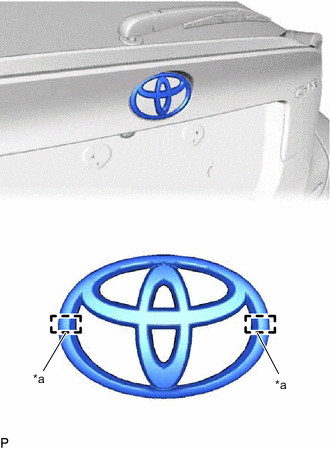
*a Location Pin Engage the location pins and install the No. 1 back door emblem as shown in the illustration.
-
-
INSTALL NO. 1 BACK DOOR NAME PLATE
-
Clean the back door outside garnish surface.
-
Using a heat light, heat the back door outside garnish surface.
-
Remove any remaining double-sided tape from the back door outside garnish.
-
Wipe off any tape adhesive residue with cleaner.
-
-
Using a heat light, heat the back door outside garnish and a new No. 1 back door name plate.
-
Remove the release paper from the No. 1 back door name plate.
Tech Tips
After removing the release paper, keep the exposed adhesive free from foreign matter.
-
Install the No. 1 back door name plate as shown in the illustration.
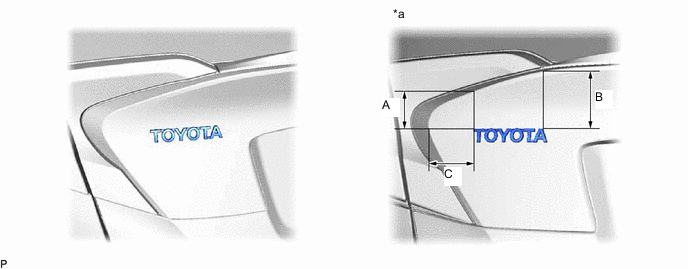
*a Reference Values - - Standard Measurement Area Measurement Area Measurement A 57.0 mm (2.24 in.) B 85.5 mm (3.37 in.) C 83.2 mm (3.28 in.) - -
-
-
INSTALL NO. 2 BACK DOOR NAME PLATE
-
Clean the back door outside garnish surface.
-
Using a heat light, heat the back door outside garnish surface.
-
Remove any remaining double-sided tape from the back door outside garnish.
-
Wipe off any tape adhesive residue with cleaner.
-
-
Using a heat light, heat the back door outside garnish and a new No. 2 back door name plate.
-
Remove the release paper from the No. 2 back door name plate.
Tech Tips
After removing the release paper, keep the exposed adhesive free from foreign matter.
-
Install the No. 2 back door name plate as shown in the illustration.

*a Reference Values - - Standard Measurement Area Measurement Area Measurement A 65.1 mm (2.56 in.) B 113.7 mm (4.48 in.)
-