RADIATOR REMOVAL
CAUTION / NOTICE / HINT
The necessary procedures (adjustment, calibration, initialization, or registration) that must be performed after parts are removed and installed, or replaced during the radiator assembly removal/installation are shown below.
| Replacement Part or Procedure | Necessary Procedures | Effects/Inoperative when not performed | Link |
|---|---|---|---|
| Removal/installation of front bumper assembly | Change grille shutter control modes and/or perform initialization* | Grille shutter system |
PROCEDURE
-
REMOVE NO. 1 ENGINE UNDER COVER
-
DRAIN ENGINE COOLANT (for Engine)
-
RECOVER REFRIGERANT FROM REFRIGERATION SYSTEM
-
REMOVE HEADLIGHT ASSEMBLY LH
-
for Halogen Headlight:
-
for LED Headlight:
-
-
REMOVE HEADLIGHT ASSEMBLY RH
Tech Tips
Use the same procedure as for the LH side.
-
REMOVE INVERTER WATER PUMP ASSEMBLY
-
REMOVE FRONT BUMPER UPPER REINFORCEMENT SUB-ASSEMBLY
-
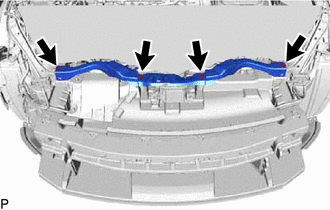
Remove the 4 bolts and front bumper upper reinforcement sub-assembly from the vehicle.
-
-
REMOVE NO. 1 RADIATOR GRILLE RETAINER
-
REMOVE NO. 1 RADIATOR TO SUPPORT SEAL
-
REMOVE HOOD LOCK NUT CAP
-
REMOVE HOOD LOCK ASSEMBLY
-
w/ Engine Hood Courtesy Switch:
-
w/o Engine Hood Courtesy Switch:
-
-
REMOVE NO. 2 AIR CLEANER INLET
-
REMOVE UPPER RADIATOR SUPPORT SUB-ASSEMBLY
-
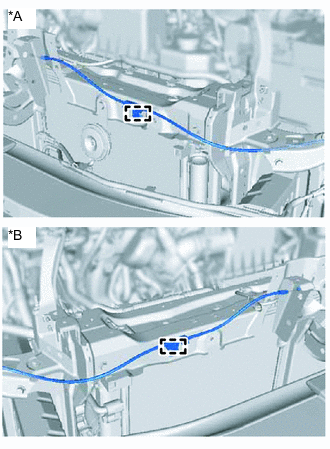
*A for LHD *B for RHD Disengage the clamp to disconnect the hood control cable sub-assembly from the upper radiator support sub-assembly.
-
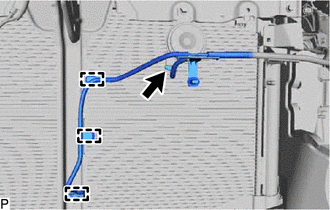
Disengage the 3 clamps to disconnect the wire harness from the horn and hood lock support assembly.
-

Disengage the 12 clamps to disconnect the wire harness from the upper radiator support sub-assembly and fan shroud assembly.
-
Disconnect the cooling fan motor RH connector and cooling fan motor LH connector.
-

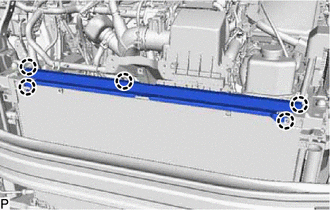
Remove the 5 bolts and upper radiator support sub-assembly together with hood lock support sub-assembly from the vehicle.
-
-
REMOVE NO. 2 RADIATOR AIR GUIDE
-
Disengage the 5 claws to remove the No. 2 radiator air guide from the radiator assembly.
-
-
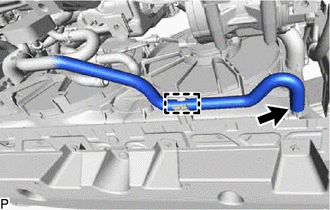
DISCONNECT NO. 1 WATER BY-PASS HOSE
-
Slide the clip and disconnect the No. 1 water by-pass hose from the radiator assembly.
-
-
DISCONNECT NO. 2 WATER BY-PASS HOSE
-
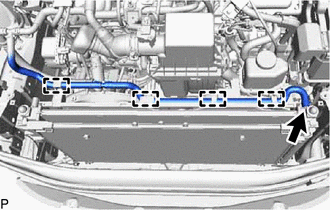
Disengage the 4 clamps from the fan shroud.
-
Slide the clip and disconnect the No. 2 water by-pass hose from the radiator assembly.
-
-
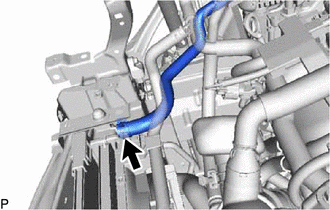
DISCONNECT INLET HYBRID RADIATOR HOSE
-
Disengage the clamp to disconnect the inlet hybrid radiator hose from the fan shroud assembly.
-
Slide the clip and disconnect the inlet hybrid radiator hose.
-
-
DISCONNECT INLET NO. 1 INVERTER COOLING HOSE
-
Slide the clip and disconnect the inlet No. 1 inverter cooling hose.
-
-
DISCONNECT NO. 1 RADIATOR HOSE
-
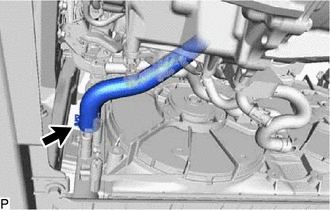
Slide the clip and disconnect the No. 1 radiator hose.
-
-
DISCONNECT NO. 2 RADIATOR HOSE
-
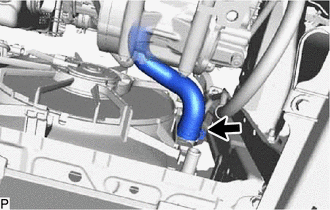
Slide the clip and disconnect the No. 2 radiator hose.
-
-
DISCONNECT OUTLET NO. 1 INVERTER COOLING HOSE
-
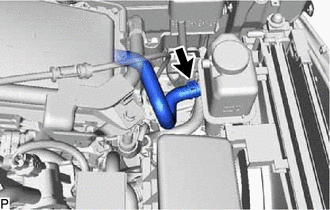
Slide the clip and disconnect the outlet No. 1 inverter cooling hose.
-
-
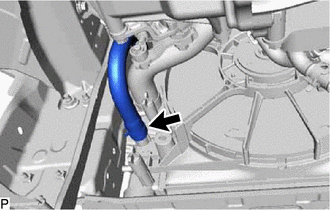
REMOVE INVERTER RESERVE TANK ASSEMBLY
-
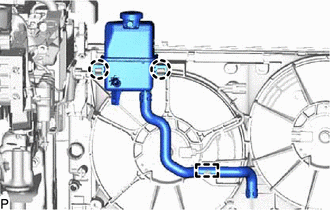
Disengage the clamp to disconnect the inlet hybrid water pump hose from the fan shroud assembly.
-
Disengage the 2 claws to remove the inverter reserve tank assembly from the fan shroud assembly.
-
-
REMOVE FRONT BUMPER ENERGY ABSORBER
-
REMOVE FRONT BUMPER REINFORCEMENT
-
REMOVE NO. 1 RADIATOR AIR GUIDE LH
-
REMOVE NO. 1 RADIATOR AIR GUIDE RH
-
REMOVE RADIATOR LOWER SEAL LH (w/ Grille Shutter)
-
REMOVE RADIATOR LOWER SEAL RH (w/ Grille Shutter)
-
REMOVE RADIATOR SHUTTER SUB-ASSEMBLY (w/ Grille Shutter)
-
DISCONNECT DISCHARGE HOSE SUB-ASSEMBLY
-
DISCONNECT SUCTION PIPE SUB-ASSEMBLY
-
REMOVE COOLER CONDENSER ASSEMBLY
-
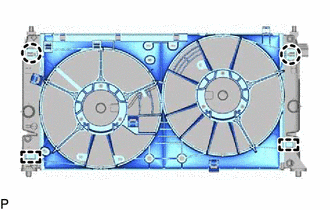
REMOVE RADIATOR ASSEMBLY
-
Remove the radiator assembly with the fan shroud assembly from the vehicle body.
-
Disengage the 2 claws.
-
Disengage the 2 guides to remove the fan shroud assembly from the radiator assembly.
Note
Do not damage the radiator assembly when removing the fan shroud assembly.
-
-
REMOVE RADIATOR SUPPORT CUSHION
-
Remove the 2 radiator support cushions from the radiator assembly.
-
-
REMOVE RADIATOR SUPPORT GROMMET
-
Remove the 2 radiator support grommets from the radiator assembly.
-
-
REMOVE RADIATOR DRAIN COCK PLUG
-
Remove the 2 radiator drain cock plug.
-
Remove the 2 O-ring from the radiator drain cock plug.
-