CANISTER INSTALLATION
Info Added 2017-10-06 ![]()
PROCEDURE
-
INSTALL CANISTER (CHARCOAL CANISTER ASSEMBLY)
-
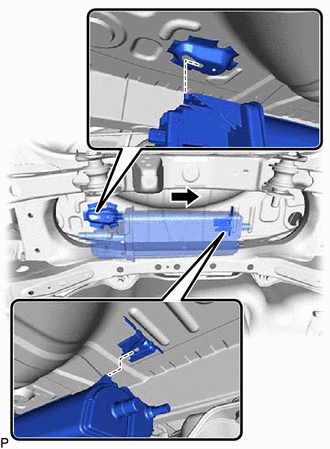
Install the canister (charcoal canister assembly) to the vehicle body as shown in the illustration.
-
Install the bolt.
- Torque:
- 10.5 N*m { 107 kgf*cm, 8 ft.*lbf }
-
Connect the charcoal canister hose to the canister (charcoal canister assembly) and slide the clip to secure it.
-
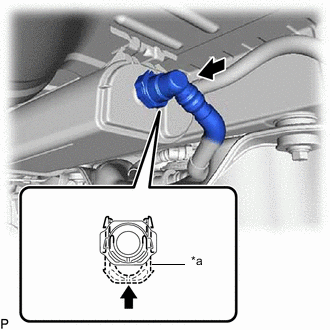
*a Retainer 
Push in Push the fuel tank vent hose onto the canister (charcoal canister assembly) and push in the retainer to engage the lock claws.
Note
-
Check that there are no scratches or foreign matter around the connecting parts of the tube connector and pipe (canister (charcoal canister assembly)) before performing this work.
-
After connecting the fuel tank vent hose, check that the fuel tank vent hose is securely connected by pulling on the tube connector.
-
-
Push in the fuel tank vent hose sub-assembly to the pipe (canister (charcoal canister assembly)) until the fuel tank vent hose sub-assembly makes a "click" sound.
Note
-
Check that there are no scratches or foreign matter around the connecting parts of the tube connector and pipe (canister (charcoal canister assembly)) before performing this work.
-
After connecting the fuel tank vent hose sub-assembly, check that the fuel tank vent hose sub-assembly is securely connected by pulling on the tube connector.
-
-
-
INSTALL REAR NO. 1 STABILIZER BAR BRACKET
-
Install the 2 rear No. 1 stabilizer bar brackets to the vehicle body with the 4 bolts.
- Torque:
- 78 N*m { 795 kgf*cm, 58 ft.*lbf }
-
-
INSTALL REAR FLOOR SIDE MEMBER COVER LH
-
INSTALL REAR FLOOR SIDE MEMBER COVER RH
-
INSTALL TAIL EXHAUST PIPE ASSEMBLY
-
INSPECT FOR EXHAUST GAS LEAK
If gas is leaking, tighten the areas necessary to stop the leak. Replace damaged parts as necessary.