ECM INSTALLATION
Info Added 2017-10-06 ![]()
PROCEDURE
-
INSTALL NO. 2 ECM BRACKET
-
Install the No. 2 ECM bracket to the ECM with the 2 screws.
- Torque:
- 4.5 N*m { 46 kgf*cm, 40 in.*lbf }
-
-
INSTALL NO. 1 ECM BRACKET
-
Install the No. 1 ECM bracket to the ECM with the 2 screws.
- Torque:
- 4.5 N*m { 46 kgf*cm, 40 in.*lbf }
-
-
INSTALL ECM
-
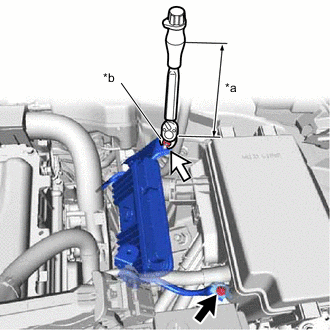
*a Torque Wrench Fulcrum Length *b 10 mm Union Nut Wrench 
Bolt 
Nut Using a 10 mm union nut wrench, tighten the nut.
- Torque:
- Specified tightening torque
- 8.0 N*m { 82 kgf*cm, 71 in.*lbf }
Tech Tips
-
Calculate the torque wrench reading when changing the fulcrum length of the torque wrench.
-
When using a 10 mm union nut wrench (fulcrum length of 22 mm (0.866 in.)) + torque wrench (fulcrum length of 162 mm (6.38 in.)):
7.0 N*m (71 kgf*cm, 62 in.*lbf)
-
Install the ECM with the bolt.
- Torque:
- 12.5 N*m { 127 kgf*cm, 9 ft.*lbf }
Note
If the ECM has been struck or dropped, replace it.
-
Install the engine wire to the No. 1 ECM bracket with the bolt.
- Torque:
- 8.0 N*m { 82 kgf*cm, 71 in.*lbf }
-
Engage the 2 clamps.
-
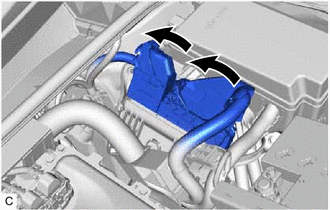
Connect the 2 ECM connectors and lower the 2 levers.
Note
-
When connecting the ECM connectors, make sure that the connecting parts of the ECM connectors are free of dirt, water or other foreign matter.
-
Be sure to securely connect the ECM connectors.
-
-
-
CONNECT CABLE TO NEGATIVE AUXILIARY BATTERY TERMINAL
Note
When disconnecting the cable, some systems need to be initialized after the cable is reconnected.
-
PERFORM INITIALIZATION