ELECTRICAL KEY OSCILLATOR(for Luggage Compartment) INSTALLATION
PROCEDURE
-
INSTALL NO. 1 INDOOR ELECTRICAL KEY ANTENNA ASSEMBLY
-
Engage the clamp to install the No. 1 indoor electrical key antenna assembly.
Note
Be careful when installing the No. 1 indoor electrical key antenna assembly. If the No. 1 indoor electrical key antenna assembly is dropped, replace it with a new one.
-
Connect the connector.
-
-
INSTALL FRONT LUGGAGE COMPARTMENT TRIM COVER
-
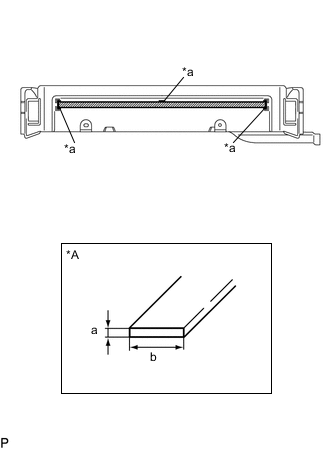
Text in Illustration *A Double-sided Tape Size *a Guide of Application Area 
Double-sided Tape Peel off the release paper from new double-sided tape, and apply the new double-sided tape to the position indicated in the illustration. Be careful not to touch the adhesive surface.
Standard Dimension Area Dimension a 3.0 mm (0.118 in.) b 15.0 mm (0.591 in.) -
Engage the 2 fasteners and attach the double-sided tape to install the front luggage compartment trim cover.
-
Install the 2 clips.
-
-
INSTALL LUGGAGE COMPARTMENT INNER TRIM COVER LH
-
INSTALL ROPE HOOK (for LH Side)
-
INSTALL LUGGAGE HOLD BELT STRIKER ASSEMBLY (for LH Side)
-
INSTALL LUGGAGE COMPARTMENT INNER TRIM COVER RH (w/o Power Trunk Lid System)
-
INSTALL LUGGAGE COMPARTMENT INNER TRIM COVER RH (w/ Power Trunk Lid System)
-
INSTALL ROPE HOOK (for RH Side)
-
INSTALL LUGGAGE HOLD BELT STRIKER ASSEMBLY (for RH Side)
-
INSTALL SPARE WHEEL COVER PAD LH
-
INSTALL SPARE WHEEL COVER PAD RH
-
INSTALL LUGGAGE COMPARTMENT FLOOR MAT