LUGGAGE COMPARTMENT DOOR OUTSIDE GARNISH INSTALLATION
PROCEDURE
-
INSTALL LUGGAGE COMPARTMENT DOOR OUTSIDE GARNISH PROTECTOR LH
-
Clean the luggage compartment door outside garnish sub-assembly.
-
Remove any remaining double-sided tape from the luggage compartment door outside garnish sub-assembly.
-
Wipe off any tape adhesive residue with cleaner.
-
-
Remove the release paper from a new luggage compartment door outside garnish protector LH.
Tech Tips
After removing the release paper, keep the exposed adhesive free from foreign matter.
-

Text in Illustration *a Marking Install the luggage compartment door outside garnish protector LH as shown in the illustration.
Standard Measurement Dimension Measurement A 1.0 mm (0.0394 in.) B 2.0 mm (0.0787 in.)
-
-
INSTALL LUGGAGE COMPARTMENT DOOR OUTSIDE GARNISH PROTECTOR RH
Tech Tips
Use the same procedure as for the LH side.
-
INSTALL LUGGAGE COMPARTMENT DOOR OUTSIDE GARNISH PROTECTOR
-
Clean the luggage compartment door outside garnish sub-assembly.
-
Remove any remaining double-sided tape from the luggage compartment door outside garnish sub-assembly.
-
Wipe off any tape adhesive residue with cleaner.
-
-
Remove the release paper from a new luggage compartment door outside garnish protector.
Tech Tips
After removing the release paper, keep the exposed adhesive free from foreign matter.
-
Install the luggage compartment door outside garnish protector as shown in the illustration.
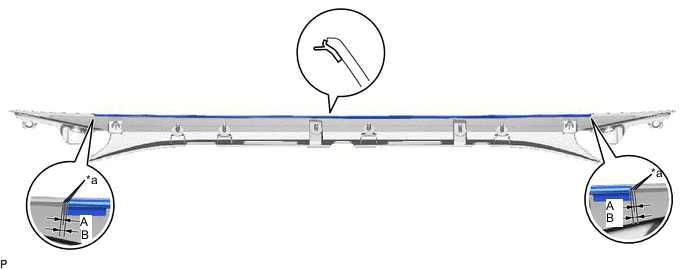
Text in Illustration *a Marking - - Standard Measurement Dimension Measurement A 1.0 mm (0.0394 in.) B 2.0 mm (0.0787 in.)
-
-
INSTALL LUGGAGE COMPARTMENT DOOR OUTSIDE GARNISH SUB-ASSEMBLY
-
Install 2 new clips to the luggage compartment door outside garnish sub-assembly.
-
Engage the 2 clips.
-
Install the 2 nuts.
-
Install the luggage compartment door outside garnish sub-assembly with the 2 screws.
-
-
INSTALL LUGGAGE ELECTRICAL KEY SWITCH
-
INSTALL LUGGAGE COMPARTMENT DOOR LOCK CYLINDER ASSEMBLY
-
INSTALL REAR LIGHT ASSEMBLY LH
-
INSTALL REAR LIGHT ASSEMBLY RH
Tech Tips
Use the same procedure as for the LH side.