CONDENSER(for V35A-FTS) REMOVAL
CAUTION / NOTICE / HINT
Tech Tips
-
Use the same procedure for RHD and LHD vehicles.
-
The procedure listed below is for LHD vehicles.
PROCEDURE
-
REMOVE RADIATOR COVER PLATE
-
REMOVE UPPER RADIATOR SUPPORT SEAL
-
REMOVE LOWER RADIATOR AIR DEFLECTOR
-
RECOVER REFRIGERANT FROM REFRIGERATION SYSTEM
-
for HFC-134a(R134a):
-
for HFO-1234yf(R1234yf):
-
-
REMOVE POP UP HOOD LIFTER ASSEMBLY LH
-
REMOVE HEADLIGHT ASSEMBLY RH
-
REMOVE HOOD LOCK RELEASE LEVER PROTECTOR
-
Remove the 2 clips.
-
Detach the clamp and remove the hood lock release lever protector.
-
-
REMOVE ENGINE HOOD COURTESY SWITCH (HOOD LOCK ASSEMBLY)
-
REMOVE HIGH PITCHED HORN ASSEMBLY
-
REMOVE LOW PITCHED HORN ASSEMBLY
-
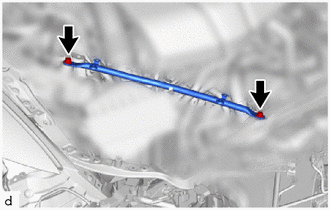
REMOVE LOWER ARM BRACKET BRACE SUB-ASSEMBLY RH
-
Remove the 2 bolts and lower arm bracket brace sub-assembly RH.
-
-
REMOVE LOWER ARM BRACKET BRACE SUB-ASSEMBLY LH
-
Remove the 2 bolts and lower arm bracket brace sub-assembly LH.
-
-
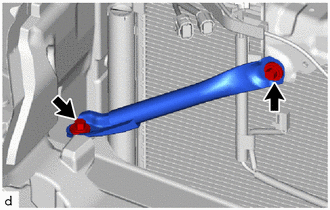
REMOVE RADIATOR SUPPORT TO CROSSMEMBER BRACE SUB-ASSEMBLY RH
-
Remove the 2 bolts and radiator support to crossmember brace sub-assembly RH.
-
-
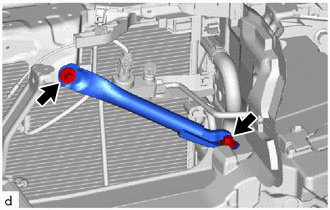
REMOVE RADIATOR SUPPORT TO CROSSMEMBER BRACE SUB-ASSEMBLY LH
-
Remove the 2 bolts and radiator support to crossmember brace sub-assembly LH.
-
-
REMOVE AIR CLEANER WITH ELEMENT ASSEMBLY RH
-
REMOVE AIR CLEANER WITH ELEMENT ASSEMBLY LH
-
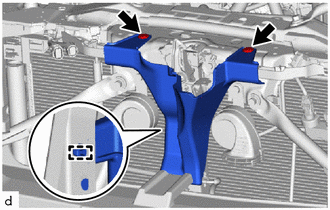
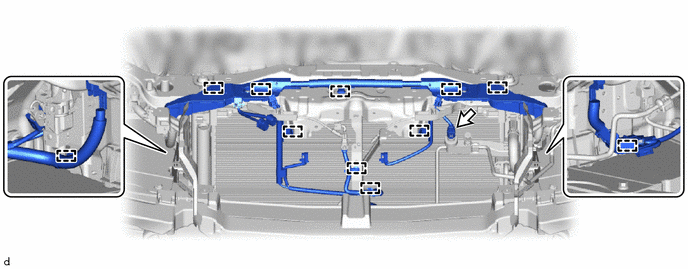
REMOVE UPPER RADIATOR SUPPORT SUB-ASSEMBLY
-
Disconnect the connector.
-
Detach the clamps and disconnect the engine room main wire.
-
for LHD:
-
Remove the screw.
-
Detach the clamp and disconnect the hood lock control cover LH.
-
-
Remove the screw.
-
Detach the clamp and disconnect the hood lock control cover RH.
-
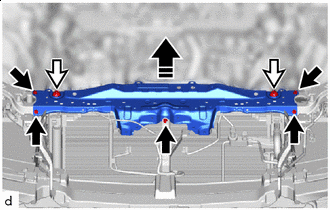

Bolt 
Sub-Radiator Support Cushion 
Remove in this Direction Remove the 5 bolts.
-
While lifting the upper radiator support sub-assembly upwards, detach the 2 sub-radiator support cushions and remove the upper radiator support sub-assembly.
Note
When disconnecting the upper radiator support sub-assembly, do not damage the cooler condenser assembly and radiator assembly.
-
-
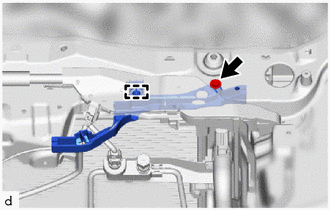
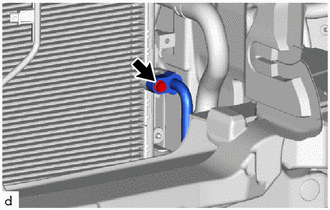
DISCONNECT LIQUID TUBE SUB-ASSEMBLY A
-
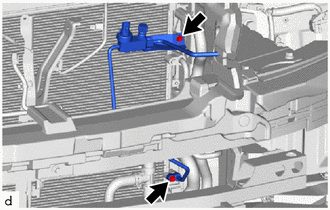
Remove the 2 bolts and disconnect liquid tube sub-assembly A and No. 1 cooler bracket from the cooler condenser assembly.
Note
Do not apply excessive force to the liquid tube sub-assembly A.
-
Remove the O-ring from the liquid tube sub-assembly A.
Note
Seal the openings of the disconnected parts using vinyl tape to prevent entry of moisture and foreign matter.
-
-
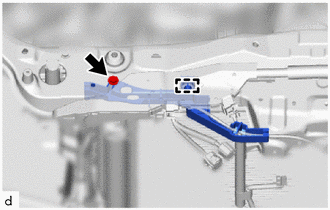
DISCONNECT DISCHARGE HOSE SUB-ASSEMBLY
-
Remove the bolt and disconnect the discharge hose sub-assembly from the cooler condenser assembly.
Note
Do not apply excessive force to the discharge hose sub-assembly.
-
Remove the O-ring from the discharge hose sub-assembly.
Note
Seal the openings of the disconnected parts using vinyl tape to prevent entry of moisture and foreign matter.
-
-
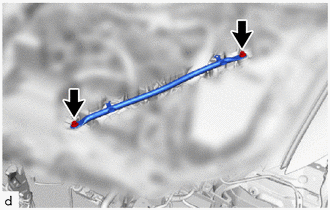
REMOVE COOLER CONDENSER ASSEMBLY
-
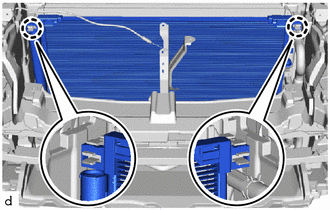
Detach the claws.
-
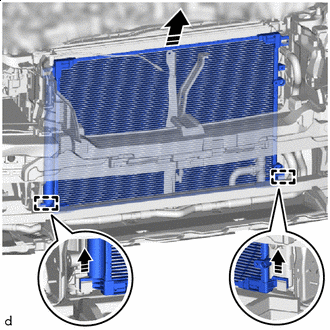
Remove in this Direction While lifting the cooler condenser assembly in the direction of the arrow shown in the illustration, detach the guide and remove the cooler condenser assembly.
Note
-
When removing the cooler condenser assembly, do not damage the cooler condenser assembly and radiator assembly.
-
-