REAR PACKAGE TRAY SPEAKER INSPECTION
PROCEDURE
-
INSPECT REAR NO. 3 SPEAKER ASSEMBLY
-
With the speaker in the installed condition, check there are no abnormalities such looseness or rattling.
-
Check that there is no foreign matter inside the speaker.
-
Check that the speaker cone is not damaged.
-
for 12 Speakers:
-
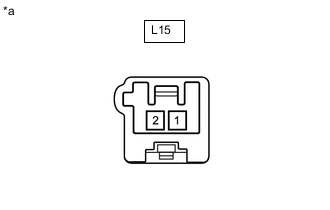
*a Component without harness connected
(Rear No. 3 Speaker Assembly)
Measure the resistance according to the value(s) in the table below.
Standard Resistance Tester Connection Condition Specified Condition L15-1 - L15-2 Always 2.5 Ω If the result is not as specified, replace the rear No. 3 speaker assembly.
-
-
for 24 Speakers:
-
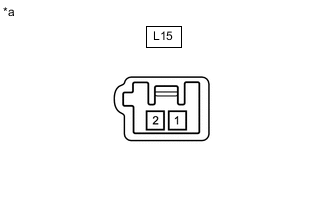
*a Component without harness connected
(Rear No. 3 Speaker Assembly)
Measure the resistance according to the value(s) in the table below.
Standard Resistance Tester Connection Condition Specified Condition L15-1 - L15-2 Always 4 Ω If the result is not as specified, replace the rear No. 3 speaker assembly.
-
-
-
INSPECT SPEAKER ASSEMBLY WITH BRACKET (for 24 Speakers)
-
With the speaker in the installed condition, check there are no abnormalities such looseness or rattling.
-
Check that there is no foreign matter inside the speaker.
-
Check that the speaker cone is not damaged.
-
Replace and check
-
Replace the front No. 2 speaker assembly with a normally functioning one and operate it again.
OK Malfunction disappears. Tech Tips
Switch the right and left speakers and perform a check when either the right or left front No. 2 speaker assembly is suspected to be malfunctioning.
-
-