FRONT DOOR BELT MOULDING INSTALLATION
CAUTION / NOTICE / HINT
Tech Tips
-
Use the same procedure for the RH side and LH side.
-
The following procedure is for the LH side.
PROCEDURE
-
PRECAUTION
Note
After turning the ignition switch off, waiting time may be required before disconnecting the cable from the negative (-) battery terminal. Therefore, make sure to read the disconnecting the cable from the negative (-) battery terminal notices before proceeding with work.
-
INSTALL FRONT DOOR BELT MOULDING ASSEMBLY
-
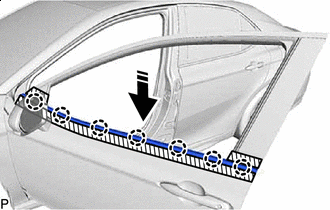

Install in this Direction Engage the 7 claws to install a new front door belt moulding assembly as shown in the illustration.
-
-
INSTALL FRONT DOOR GLASS SUB-ASSEMBLY
-
INSTALL FRONT DOOR SERVICE HOLE COVER
-
INSTALL FRONT DOOR INNER GLASS WEATHERSTRIP WITH FRONT DOOR VENT SEAL
-
INSTALL FRONT DOOR TRIM BOARD SUB-ASSEMBLY
-
INSTALL COURTESY LIGHT ASSEMBLY
-
INSTALL FRONT ARMREST ASSEMBLY
-
INSTALL MULTIPLEX NETWORK MASTER SWITCH ASSEMBLY WITH FRONT DOOR UPPER ARMREST BASE PANEL (for Driver Side)
-
INSTALL POWER WINDOW REGULATOR SWITCH ASSEMBLY WITH FRONT DOOR UPPER ARMREST BASE PANEL (for Front Passenger Side)
-
INSTALL FRONT DOOR ARMREST COVER SUB-ASSEMBLY
-
INSTALL FRONT DOOR LOWER FRAME BRACKET GARNISH
-
CONNECT CABLE TO NEGATIVE BATTERY TERMINAL
for 2AR-FE:
for A25A-FKS:
for 2GR-FKS:
-
INITIALIZE POWER WINDOW CONTROL SYSTEM
-
INSPECT POWER WINDOW OPERATION