РЕГУЛЯТОР ДАВЛЕНИЯ В ТОПЛИВНОЙ СИСТЕМЕ СНЯТИЕ
CAUTION / NOTICE / HINT
The necessary procedures (adjustment, calibration, initialization, or registration) that must be performed after parts are removed, installed, or replaced during the fuel pressure regulator assembly removal/installation are shown below.
| Replacement Part or Procedure | Necessary Procedures | Effects/Inoperative when not Performed | Link |
|---|---|---|---|
| Battery terminal is disconnected/reconnected | Drive the vehicle until stop and start control is permitted (approximately 5 to 60 minutes) | Stop and start system | |
| Memorize steering angle neutral point | Panoramic view monitor system | ||
| Initialize back door lock | Power door lock control system | ||
| Initialize servo motor | Air conditioning system | ||
| Reset slide door close position | Power slide door system | ||
| Reset back door close position | Power back door system | ||
| Replacement of fuel pump | Inspection After Repair |
|
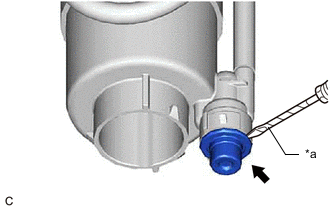
Note
-
Do not disconnect the tube shown in the illustration when disassembling the fuel suction tube with pump and gauge assembly. Doing so will cause reassembly of the fuel suction tube with pump and gauge assembly to be impossible as the tube is pressed into the fuel suction plate sub-assembly.
-
When replacing the fuel filter, replace it together with the fuel suction plate sub-assembly.

| *a | Tube |
PROCEDURE
-
REMOVE FUEL SUCTION TUBE WITH PUMP AND GAUGE ASSEMBLY
-
REMOVE FUEL SENDER GAUGE ASSEMBLY
-
REMOVE FUEL SUCTION PLATE SUB-ASSEMBLY
-
REMOVE FUEL PUMP
-
REMOVE FUEL PRESSURE REGULATOR ASSEMBLY
-
*a Protective Tape Using a screwdriver with its tip wrapped with protective tape, remove the fuel pressure regulator assembly from the fuel filter.
Note
-
Pull out the fuel pressure regulator assembly carefully because the O-rings are firmly installed between the fuel pressure regulator assembly and fuel filter.
-
Do not damage the fuel filter.
-
-
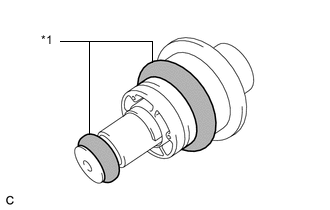
*1 O-ring Remove the 2 O-rings from the fuel pressure regulator assembly.
-