FRONT DOOR WINDOW FRAME MOULDING INSTALLATION
CAUTION / NOTICE / HINT
Tech Tips
-
Use the same procedure for the RH and LH side.
-
The following procedure is for the LH side.
PROCEDURE
-
INSTALL FRONT DOOR REAR WINDOW FRAME LH
-
INSTALL FRONT DOOR REAR LOWER FRAME SUB-ASSEMBLY LH
-
INSTALL FRONT DOOR GLASS SUB-ASSEMBLY LH
-
INSTALL FRONT DOOR FRONT WINDOW FRAME MOULDING LH
-
Install the front door front window frame moulding LH with 2 new clips.
-
-
INSTALL FRONT DOOR NO. 3 GLASS RUN LH
-
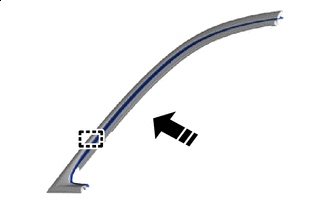

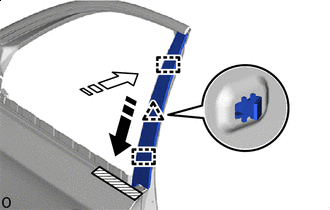
Install in this Direction Attach the guide to install the front door No. 3 glass run LH to the front door upper window frame moulding LH.
-
Attach the guide.
-
Install the clip.
-
-
INSTALL FRONT DOOR UPPER WINDOW FRAME MOULDING LH
-
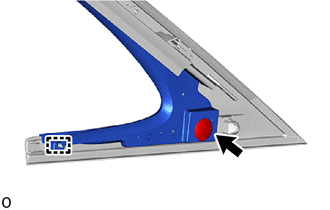
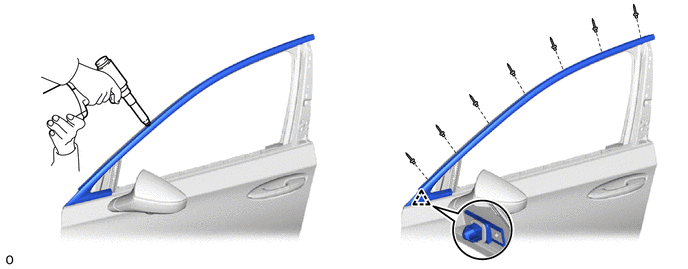
Attach the clip to install the front door upper window frame moulding LH.
-
Using an air riveter or hand riveter with a nose piece, install the front door upper window frame moulding LH with 7 new rivets.
Tech Tips
If the mandrel of the rivet does not come off on the first operation of the rivet gun, slide the rivet gun forward on the mandrel and operate it again.
Note
-
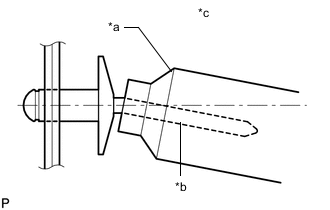
*a Riveter *b Mandrel *c Incorrect Do not pry the rivet with the riveter, as this will cause damage to the riveter and mandrel.
-
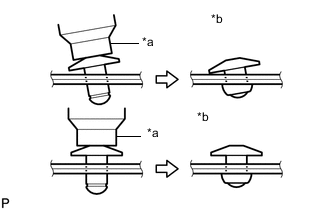
*a Riveter *b Incorrect Confirm that the rivets are seated properly against the moulding.
-
Do not tilt the riveter when installing the rivet to the moulding.
-
Do not leave any space between the rivet head and moulding.
-
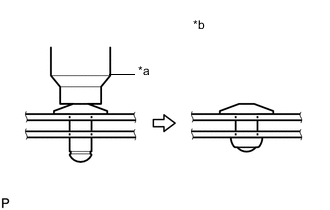
*a Riveter *b Incorrect Do not leave any space between the moulding and door frame. Firmly hold the 2 items together while installing the rivet.
-
-
-
INSTALL FRONT DOOR GLASS RUN LH
-
INSTALL FRONT PILLAR UPPER COVER SUB-ASSEMBLY LH
-
ADJUST FRONT DOOR GLASS SUB-ASSEMBLY LH
-
INSTALL FRONT DOOR WINDOW FRAME MOULDING LH(CENTER PILLAR SIDE)
-
Install in this Direction (1) 
Install in this Direction (2) Attach the guide and clip to install the front door window frame moulding LH (center pillar side) as shown in the illustration.
-
Install the 3 nuts.
- Torque:
- 5.5 N*m { 56 kgf*cm, 49 in.*lbf }
-
Remove the protective tape.
-
-
INSTALL FRONT DOOR REAR BELT MOULDING END COVER LH
-
INSTALL FRONT DOOR BELT MOULDING LH
-
INSTALL FRONT DOOR NO. 2 WEATHERSTRIP LH
-
INSTALL FRONT DOOR NO. 3 WEATHERSTRIP LH
-
INSTALL FRONT DOOR SERVICE HOLE COVER LH
-
INSTALL FRONT DOOR VENT SEAL LH
-
INSTALL FRONT DOOR GLASS INNER WEATHERSTRIP LH
-
INSTALL UPPER DOOR FRAME GARNISH LH
-
INSTALL FRONT DOOR TRIM COVER LH
-
INSTALL FRONT DOOR TRIM BOARD SUB-ASSEMBLY LH
-
INSTALL FRONT DOOR NO. 2 ARMREST COVER LH
-
INSTALL FRONT DOOR ARMREST COVER LH
-
INSTALL FRONT DOOR TRIM UPPER COVER LH
-
INSPECT FITTING OF FRONT DOOR TRIM BOARD SUB-ASSEMBLY
-
CONNECT CABLE TO NEGATIVE BATTERY TERMINAL
for 8GR-FKS:
for V35A-FTS:
Note
When disconnecting the cable, some systems need to be initialized after the cable is reconnected.
-
INSTALL LUGGAGE COMPARTMENT MAT SUB-ASSEMBLY
-
INITIALIZE POWER WINDOW CONTROL SYSTEM
-
CHECK POWER WINDOW CONTROL SYSTEM