AIR CONDITIONING SYSTEM Air Conditioning Control Panel Circuit
DESCRIPTION
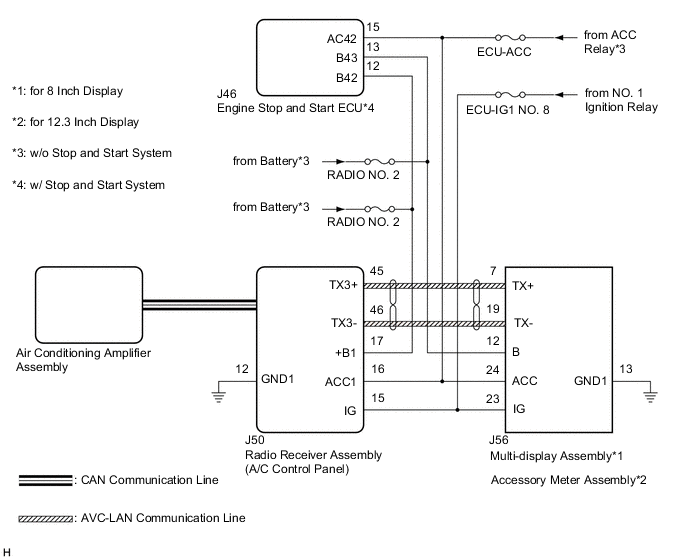
The radio receiver assembly (A/C control panel) switch signals are sent to the air conditioning amplifier assembly via CAN communication.
WIRING DIAGRAM
CAUTION / NOTICE / HINT
Note
Inspect the fuses for circuits related to this system before performing the following procedure.
PROCEDURE
-
CHECK CAN COMMUNICATION SYSTEM
-
Using the GTS, check if the CAN communication system is functioning normally.
Result Result Proceed to CAN communication system DTCs are not output A CAN communication system DTCs are output B
B 
GO TO CAN COMMUNICATION SYSTEM Click here
A 
-
-
CHECK AVC-LAN COMMUNICATION CIRCUIT
-
Check for an open or short in all AVC-LAN communication circuits.
w/ Navigation System: Click here
w/ Audio and Visual System (for 12.3 Inch Display): Click here
w/ Audio and Visual System (for 8 Inch Display): Click here
OK There is no open or short circuit. Result Proceed to OK NG
NG
REPAIR AVC-LAN COMMUNICATION CIRCUIT
OK
-
-
CHECK HARNESS AND CONNECTOR (RADIO RECEIVER ASSEMBLY (A/C CONTROL PANEL) - POWER SOURCE AND BODY GROUND)
-
Disconnect the J50 radio receiver assembly (A/C control panel) connector.
-
Measure the voltage according to the value(s) in the table below.
Standard Voltage Tester Connection Condition Specified Condition J50-15 (IG) - Body ground Engine switch on (IG) 11 to 14 V -
Measure the resistance according to the value(s) in the table below.
Standard Resistance Tester Connection Condition Specified Condition J50-12 (GND1) - Body ground Always Below 1 Ω Result Proceed to OK NG
NG
REPAIR OR REPLACE HARNESS OR CONNECTOR
OK
-
-
CONFIRM MODEL
-
Choose the model to be inspected.
Result Result Proceed to for 8 Inch Display A for 12.3 Inch Display B
B 
CHECK HARNESS AND CONNECTOR (ACCESSORY METER ASSEMBLY - POWER SOURCE, BODY GROUND) Click here
A
-
-
CHECK HARNESS AND CONNECTOR (MULTI-DISPLAY ASSEMBLY - POWER SOURCE AND BODY GROUND)
-
Disconnect the J56 multi-display assembly connector.
-
Measure the voltage according to the value(s) in the table below.
Standard Voltage Tester Connection Condition Specified Condition J56-23 (IG) - Body ground Engine switch on (IG) 11 to 14 V -
Measure the resistance according to the value(s) in the table below.
Standard Resistance Tester Connection Condition Specified Condition J56-13 (GND1) - Body ground Always Below 1 Ω Result Proceed to OK NG
NG
REPAIR OR REPLACE HARNESS OR CONNECTOR
OK
-
-
CONFIRM MODEL
-
Choose the model to be inspected.
Result Result Proceed to w/o Stop and Start System A w/ Stop and Start System B
B
CHECK HARNESS AND CONNECTOR (RADIO RECEIVER ASSEMBLY (A/C CONTROL PANEL), MULTI-DISPLAY ASSEMBLY - ENGINE STOP AND START ECU) Click here
A
-
-
CHECK HARNESS AND CONNECTOR (RADIO RECEIVER ASSEMBLY (A/C CONTROL PANEL), MULTI-DISPLAY ASSEMBLY - POWER SOURCE)
-
Measure the voltage according to the value(s) in the table below.
Standard Voltage Tester Connection Condition Specified Condition J50-17 (+B1) - Body ground Always 11 to 14 V J50-16 (ACC1) - Body ground Engine switch on (ACC) 11 to 14 V J56-12 (B) - Body ground Always 11 to 14 V J56-24 (ACC) - Body ground Engine switch on (ACC) 11 to 14 V Result Proceed to OK NG
OK
PROCEED TO NEXT SUSPECTED AREA SHOWN IN PROBLEM SYMPTOMS TABLE Click here
NG
REPAIR OR REPLACE HARNESS OR CONNECTOR
-
-
CHECK HARNESS AND CONNECTOR (RADIO RECEIVER ASSEMBLY (A/C CONTROL PANEL), MULTI-DISPLAY ASSEMBLY - ENGINE STOP AND START ECU)
-
Disconnect the J46 engine stop and start ECU connector.
-
Measure the resistance according to the value(s) in the table below.
Standard Resistance Tester Connection Condition Specified Condition J46-15 (AC42) - J50-16 (ACC1) Always Below 1 Ω J46-15 (AC42) - J56-24 (ACC) Always Below 1 Ω J46-12 (B42) - J50-17 (+B1) Always Below 1 Ω J46-13 (B43) - J56-12 (B) Always Below 1 Ω Result Proceed to OK NG
NG
REPAIR OR REPLACE HARNESS OR CONNECTOR
OK
-
-
CHECK HARNESS AND CONNECTOR (RADIO RECEIVER ASSEMBLY (A/C CONTROL PANEL), MULTI-DISPLAY ASSEMBLY - ENGINE STOP AND START ECU)
-
Reconnect the J46 engine stop and start ECU connector.
-
Measure the voltage according to the value(s) in the table below.
Standard Voltage Tester Connection Condition Specified Condition J50-17 (+B1) - Body ground Always 9.5 to 14 V J50-16 (ACC1) - Body ground Engine switch on (ACC) 9.5 to 14 V J56-12 (B) - Body ground Always 9.5 to 14 V J56-24 (ACC) - Body ground Engine switch on (ACC) 9.5 to 14 V Result Proceed to OK NG
OK
PROCEED TO NEXT SUSPECTED AREA SHOWN IN PROBLEM SYMPTOMS TABLE Click here
NG
GO TO STOP AND START SYSTEM Click here
-
-
CHECK HARNESS AND CONNECTOR (ACCESSORY METER ASSEMBLY - POWER SOURCE, BODY GROUND)
-
Disconnect the J56 accessory meter assembly connector.
-
Measure the voltage according to the value(s) in the table below.
Standard Voltage Tester Connection Condition Specified Condition J56-23 (IG) - Body ground Engine switch on (IG) 11 to 14 V -
Measure the resistance according to the value(s) in the table below.
Standard Resistance Tester Connection Condition Specified Condition J56-13 (GND1) - Body ground Always Below 1 Ω Result Proceed to OK NG
NG
REPAIR OR REPLACE HARNESS OR CONNECTOR
OK
-
-
CONFIRM MODEL
-
Choose the model to be inspected.
Result Result Proceed to w/o Stop and Start System A w/ Stop and Start System B
B
CHECK HARNESS AND CONNECTOR (RADIO RECEIVER ASSEMBLY (A/C CONTROL PANEL), ACCESSORY METER ASSEMBLY - ENGINE STOP AND START ECU) Click here
A
-
-
CHECK HARNESS AND CONNECTOR (RADIO RECEIVER ASSEMBLY (A/C CONTROL PANEL), ACCESSORY METER ASSEMBLY - POWER SOURCE)
-
Measure the voltage according to the value(s) in the table below.
Standard Voltage Tester Connection Condition Specified Condition J50-17 (+B1) - Body ground Always 11 to 14 V J50-16 (ACC1) - Body ground Engine switch on (ACC) 11 to 14 V J56-12 (B) - Body ground Always 11 to 14 V J56-24 (ACC) - Body ground Engine switch on (ACC) 11 to 14 V Result Proceed to OK NG
OK
PROCEED TO NEXT SUSPECTED AREA SHOWN IN PROBLEM SYMPTOMS TABLE Click here
NG
REPAIR OR REPLACE HARNESS OR CONNECTOR
-
-
CHECK HARNESS AND CONNECTOR (RADIO RECEIVER ASSEMBLY (A/C CONTROL PANEL), ACCESSORY METER ASSEMBLY - ENGINE STOP AND START ECU)
-
Disconnect the J46 engine stop and start ECU connector.
-
Measure the resistance according to the value(s) in the table below.
Standard Resistance Tester Connection Condition Specified Condition J46-15 (AC42) - J50-16 (ACC1) Always Below 1 Ω J46-15 (AC42) - J56-24 (ACC) Always Below 1 Ω J46-12 (B42) - J50-17 (+B1) Always Below 1 Ω J46-13 (B43) - J56-12 (B) Always Below 1 Ω Result Proceed to OK NG
NG
REPAIR OR REPLACE HARNESS OR CONNECTOR
OK
-
-
CHECK HARNESS AND CONNECTOR (RADIO RECEIVER ASSEMBLY (A/C CONTROL PANEL), ACCESSORY METER ASSEMBLY - ENGINE STOP AND START ECU)
-
Reconnect the J46 engine stop and start ECU connector.
-
Measure the voltage according to the value(s) in the table below.
Standard Voltage Tester Connection Condition Specified Condition J50-17 (+B1) - Body ground Always 9.5 to 14 V J50-16 (ACC1) - Body ground Engine switch on (ACC) 9.5 to 14 V J56-12 (B) - Body ground Always 9.5 to 14 V J56-24 (ACC) - Body ground Engine switch on (ACC) 9.5 to 14 V Result Proceed to OK NG
OK
PROCEED TO NEXT SUSPECTED AREA SHOWN IN PROBLEM SYMPTOMS TABLE Click here
NG
GO TO STOP AND START SYSTEM Click here
-