FUEL LID LOCK CONTROL CABLE ASSEMBLY(for Hatchback RHD) INSTALLATION
PROCEDURE
INSTALL FUEL LID LOCK CONTROL CABLE SUB-ASSEMBLY (for Rear Side)
-
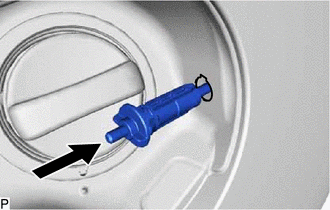
Insert the fuel lid lock control cable sub-assembly as shown in the illustration.
Engage the 2 claws and install the fuel lid lock control cable sub-assembly.
Connect the fuel lid lock control cable sub-assembly.
-
INSTALL FUEL LID LOCK OPEN LEVER SUB-ASSEMBLY
Connect the fuel lid lock control cable sub-assembly to the fuel lid lock open lever sub-assembly.
-

Engage the guide and install the fuel lid lock open lever sub-assembly as shown in the illustration.
Install the fuel lid lock open lever sub-assembly with the screw.
5.5 N*m
56 kgf*cm
49 in.*lbf
INSTALL FUEL LID LOCK CONTROL CABLE SUB-ASSEMBLY (for Front Side)
Engage the 11 clamps and install the fuel lid lock control cable sub-assembly.
Return the floor carpet to the original position.
Install the clip.
Engage the 3 clamp.
Tip:Use the same procedure as for the LH side.
INSTALL STEREO COMPONENT SPEAKER ASSEMBLY (w/ Woofer)
INSTALL DECK TRIM SIDE PANEL ASSEMBLY LH
INSTALL LOWER DECK TRIM SIDE BOARD LH (w/ Deck Board)
INSTALL NO. 2 DECK SIDE TRIM HOOK (for LH Side)
INSTALL REAR SEAT SIDE GARNISH LH
INSTALL REAR SEATBACK HINGE SUB-ASSEMBLY LH
INSTALL CENTER PILLAR LOWER GARNISH RH
CONNECT FRONT SEAT OUTER BELT ASSEMBLY RH
INSTALL LAP BELT OUTER ANCHOR COVER (for RH Side)
INSTALL REAR DOOR OPENING TRIM WEATHERSTRIP RH
INSTALL REAR DOOR SCUFF PLATE RH
INSTALL FRONT DOOR OPENING TRIM WEATHERSTRIP RH
INSTALL FRONT DOOR SCUFF PLATE RH
INSTALL CENTER PILLAR LOWER GARNISH LH
Tip:Use the same procedure as for the RH side.
CONNECT FRONT SEAT OUTER BELT ASSEMBLY LH
Tip:Use the same procedure as for the RH side.
INSTALL LAP BELT OUTER ANCHOR COVER (for LH Side)
Tip:Use the same procedure as for the RH side.
INSTALL REAR DOOR OPENING TRIM WEATHERSTRIP LH
INSTALL REAR DOOR SCUFF PLATE LH
Tip:Use the same procedure as for the RH side.
INSTALL FRONT DOOR OPENING TRIM WEATHERSTRIP LH
INSTALL FRONT DOOR SCUFF PLATE LH
Tip:Use the same procedure as for the RH side.
INSTALL REAR SEATBACK ASSEMBLY LH
INSTALL REAR SEAT HEADREST ASSEMBLY
INSTALL REAR SEAT CUSHION ASSEMBLY
INSTALL REAR DECK TRIM COVER
INSTALL PACKAGE TRAY TRIM PANEL ASSEMBLY (w/ Package Tray Trim)
INSTALL DECK FLOOR BOX LH (w/ Deck Floor Box)
INSTALL REAR DECK FLOOR BOX (w/ Deck Floor Box)
INSTALL REAR FLOOR MAT ASSEMBLY
INSTALL DECK BOARD ASSEMBLY (w/ Deck Board)
INSTALL FRONT SEAT ASSEMBLY RH
INSTALL FRONT SEAT ASSEMBLY LH
Tip:Use the same procedure as for the LH side and RH side.