SHIFT LEVER INSTALLATION
CAUTION / NOTICE / HINT
Tech Tips
-
Use the same procedure for RHD and LHD vehicles.
-
The procedure listed below is for LHD vehicles.
PROCEDURE
-
INSTALL SHIFT LEVER ASSEMBLY
-
Temporarily install the shift lever assembly with the 4 bolts.
-
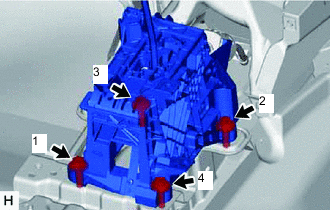
Tighten the bolts in the order shown in the illustration.
- Torque:
- 12 N*m { 122 kgf*cm, 9 ft.*lbf }
-
Install the nut to the shift lever assembly.
-
Connect the 2 clamps.
-
Connect the shift lock control ECU connector.
-
Connect the transmission control switch connector.
-
-
CONNECT TRANSMISSION CONTROL CABLE ASSEMBLY
-

*a Nut *b Stopper *c Push in Turn the nut of the transmission control cable 180° clockwise. While holding the nut in place, push in the stopper to lock the nut.
Note
Do not over-rotate the nut as it will come off the internal spring and the transmission control cable will not be reusable.
Tech Tips
If the stopper cannot be pushed in, slightly turn the nut clockwise and then push in the stopper again.
-
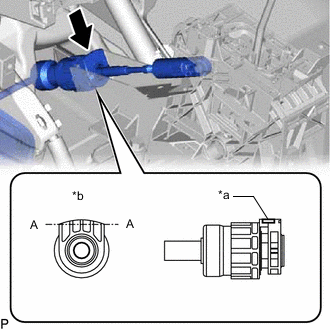
*a Stopper *b Protrusion Connect the outer part of the transmission control cable assembly to the shift lever assembly.
Note
After installation, check that the outer part of the cable lock is protruding beyond portion A-A as shown in the illustration.
-
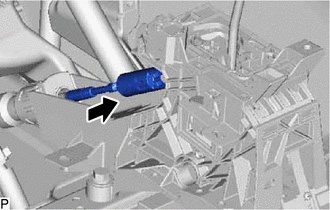
Connect the end of the transmission control cable assembly to the shift lever assembly.
Note
-
Check that the shift lever position sensor and the shift lever are in neutral.
-
Securely install the end of the transmission control cable assembly to the transmission floor shift assembly.
-
Install the end of the transmission control cable assembly so that its adjustment lock section is on the driver side.
-
-
-
INSPECT SHIFT LEVER POSITION
-
ADJUST SHIFT LEVER POSITION
-
INSTALL CONSOLE BOX ASSEMBLY (w/o ASC System)
-
INSTALL NO. 1 SPEAKER WITH BOX ASSEMBLY (w/ ASC System)