FUEL TANK(w/ Canister Pump Module) REMOVAL
PROCEDURE
-
DISCHARGE FUEL SYSTEM PRESSURE
-
PRECAUTION
Note
After turning the ignition switch off, waiting time may be required before disconnecting the cable from the battery terminal. Therefore, make sure to read the disconnecting the cable from the battery terminal notice before proceeding with work.
-
DISCONNECT CABLE FROM NEGATIVE BATTERY TERMINAL
Note
When disconnecting the cable, some systems need to be initialized after the cable is reconnected.
-
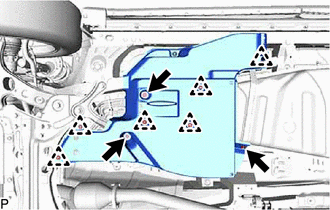
REMOVE FRONT FLOOR COVER CENTER LH
-
Remove the bolt, 2 nuts and 6 clips from the front floor cover center LH.
-
Loosen the nut and remove the front floor cover center LH.
-
-
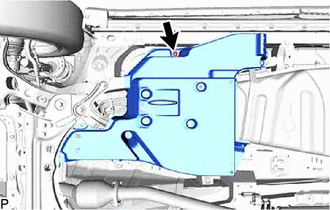
REMOVE NO. 2 FLOOR UNDER COVER
-

Detach the clip and loosen the 2 nuts and No. 2 floor under cover.
-
-
DISCONNECT FUEL TANK TO CANISTER TUBE SUB-ASSEMBLY
-
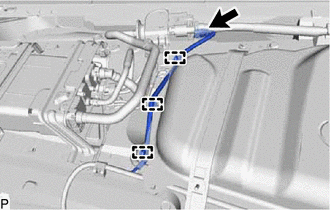
Disconnect the connector from the charcoal canister assembly.
-
Detach the 3 clamps and disconnect the fuel gauge wire.
-
Disconnect the fuel tank to canister tube sub-assembly from the charcoal canister assembly.
-
-
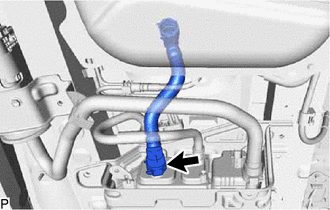
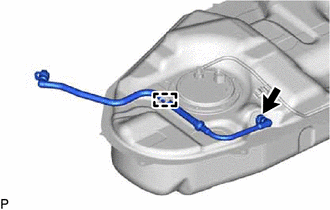
DISCONNECT FUEL TANK MAIN TUBE SUB-ASSEMBLY
-

Disconnect the fuel tank main tube sub-assembly from the fuel pipe.
-
-
DRAIN FUEL
Note
-
When disconnecting the fuel tank to filler pipe hose, fuel remaining in the fuel tank assembly may be discharged.
-
Be aware that fuel discharging cannot be performed if the fuel pump is malfunctioning.
-
Connect the cable to the negative (-) battery terminal.
-
Connect the GTS to the DLC3.
-
Turn the engine switch on (IG).
-
Turn the GTS on.
-
Enter the following menus: Powertrain / Engine and ECT / Active Test / Control the Fuel Pump / Speed.
Powertrain > Engine and ECT > Active TestTester Display Control the Fuel Pump / Speed -
According to the display on the GTS, operate the fuel pump and discharge the fuel from the fuel tank main tube sub-assembly.
CAUTION:
-
Do not smoke or be near an open flame when working on the fuel system.
-
Secure good ventilation.
-
Keep gasoline away from rubber or leather parts.
-
-
Disconnect the cable from the negative (-) battery terminal.
-
-
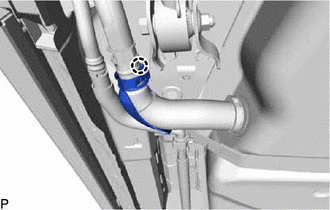
REMOVE FUEL HOSE PROTECTOR
-
Detach the claw and remove the fuel hose protector from the fuel tank to filler pipe hose.
-
-
DISCONNECT FUEL TANK TO FILLER PIPE HOSE
-
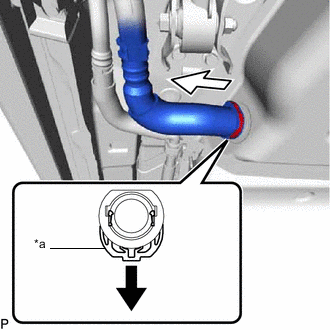
*a Retainer 
Pull out 
Pull out Pull out the retainer to disengage the lock claws and pull off the fuel tank to filler pipe hose from fuel tank assembly.
Note
-
Do not scratch or allow any foreign matter to get on the parts when disconnecting them as the fuel tank to filler pipe hose connector has an O-ring that seals the fuel tank filler pipe assembly.
-
Be sure to disconnect the fuel tank to filler pipe hose connector by hand.
-
Do not bend, twist, pinch or kink the fuel tank to filler pipe hose.
-
Cover the disconnected fuel tank to filler pipe hose with a plastic bag to prevent damage and contamination.
-
If the fuel tank to filler pipe hose connector and fuel tank filler pipe assembly are stuck, push and pull to release them.
-
-
-
DISCONNECT FUEL TANK VENT HOSE SUB-ASSEMBLY
-
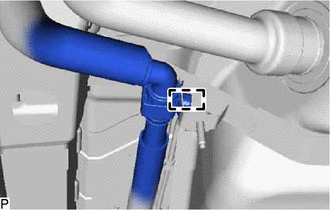
Detach the clamp and disconnect the fuel tank vent hose sub-assembly from the No. 2 fuel tank band sub-assembly.
-
-
DISCONNECT FUEL TANK BREATHER TUBE SUB-ASSEMBLY
-
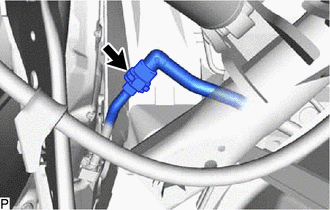
Disconnect the fuel tank breather tube sub-assembly from the fuel tank filler pipe sub-assembly.
-
-
REMOVE FUEL TANK ASSEMBLY
-
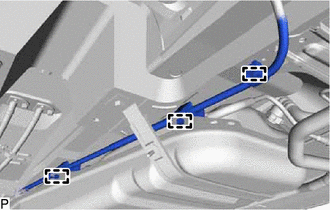
Disconnect the 3 clamps from the 2 No. 4 fuel tube clamps and the bracket on the vehicle side.
-
Using an engine lifter and attachments, support the fuel tank assembly.
-
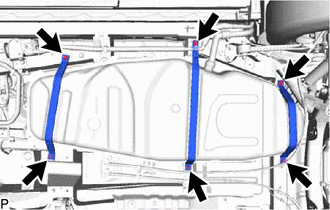
Remove the 2 bolts and No. 1 fuel tank band sub-assembly.
-
Remove the 2 bolts and 2 No. 2 fuel tank band sub-assemblies.
-
Remove the 2 bolts and 2 No. 3 fuel tank band sub-assemblies.
-
Slightly lower the engine lifter.
Note
Be careful not to cut the fuel gauge wire.
-
Disconnect the 2 connectors from the fuel sender gauge assembly and fuel suction tube assembly with pump.
Note
-
Before starting the operation, check that there is no mud or other dirt on the connector.
-
Do not use any tools.
-
-
Detach the 3 clamps from the No. 3 fuel tube clamp, No. 4 fuel tube clamp and No. 5 fuel tube clamp, and disconnect the fuel gauge wire from the fuel tank assembly.
-
-
DISCONNECT FUEL TANK MAIN TUBE SUB-ASSEMBLY
-
REMOVE FUEL TANK VENT TUBE SET PLATE
-
REMOVE FUEL SUCTION TUBE ASSEMBLY WITH PUMP
-
REMOVE FUEL SENDER GAGE ASSEMBLY
-
REMOVE FUEL TANK TO CANISTER TUBE SUB-ASSEMBLY
-
Remove the fuel tank to canister tube sub-assembly from the fuel tank assembly.
-
-
REMOVE FUEL TANK BREATHER TUBE SUB-ASSEMBLY
-
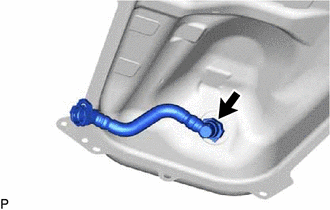
Detach the clamp and remove the fuel tank breather tube sub-assembly from the fuel tank assembly.
-
-
REMOVE FUEL TANK MAIN TUBE SUB-ASSEMBLY
-
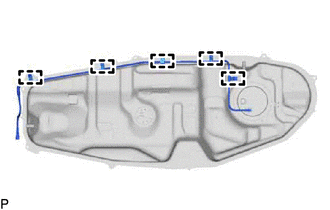
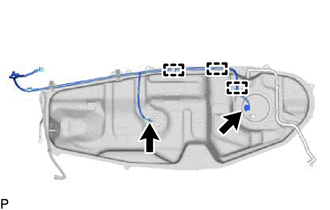
Disconnect the 5 clamps and remove the fuel tank main tube sub-assembly from the No. 3 fuel tube clamp, 3 No. 4 fuel tube clamps and No. 5 fuel tube clamp.
-
-
REMOVE NO. 3 FUEL TUBE CLAMP
-
Remove the No. 3 fuel tube clamp from the fuel tank assembly.
-
-
REMOVE NO. 4 FUEL TUBE CLAMP
-
Remove the 3 No. 4 fuel tube clamps from the fuel tank assembly.
-
-
REMOVE NO. 5 FUEL TUBE CLAMP
-
Remove the No. 5 fuel tube clamp from the fuel tank assembly.
-