OUTER REAR VIEW MIRROR INSPECTION
PROCEDURE
INSPECT OUTER REAR VIEW MIRROR ASSEMBLY RH
Check the operation of the mirror surface.
Note:If the mirror surface is fully turned to the right, left, upward or downward position, the motor slips and produces a clicking noise. This is not a malfunction.
-
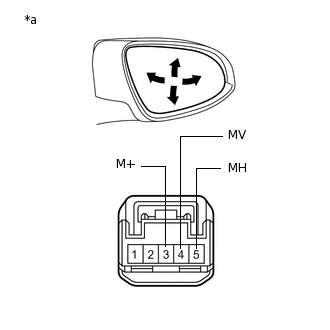
*a
Component without harness connected
(Outer Rear View Mirror Assembly RH)
Disconnect the outer rear view mirror assembly RH connector.
Apply battery voltage and check the operation of the mirror surface.
OK
Battery Connection
Specified Condition
Battery positive (+) → Terminal 4 (MV)
Battery negative (-) → Terminal 3 (M+)
Turns upward
Battery positive (+) → Terminal 3 (M+)
Battery negative (-) → Terminal 4 (MV)
Turns downward
Battery positive (+) → Terminal 5 (MH)
Battery negative (-) → Terminal 3 (M+)
Turns left
Battery positive (+) → Terminal 3 (M+)
Battery negative (-) → Terminal 5 (MH)
Turns right
If the result is not as specified, replace the outer rear view mirror assembly RH.
-
Check the operation of the mirror heater.
-
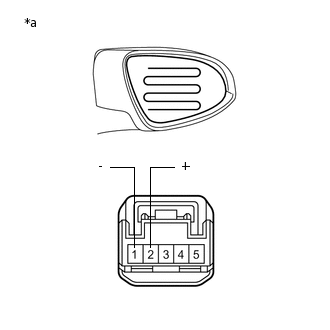
*a
Component without harness connected
(Outer Rear View Mirror Assembly RH)
Disconnect the outer rear view mirror assembly RH connector.
Measure the resistance according to the value(s) in the table below.
Standard Resistance
Tester Connection
Condition
Specified Condition
2 (+) - 1 (-)
25°C (77°F)
3.57 to 4.83 Ω
If the result is not as specified, replace the outer rear view mirror assembly RH.
Connect a cable from the positive (+) battery terminal to terminal 2 and the negative (-) battery terminal to terminal 1, then check that the mirror becomes warm.
Tip:It takes a short time for the mirror to become warm.
OK
Mirror becomes warm.
If the result is not as specified, replace the outer rear view mirror assembly RH.
-
INSPECT OUTER REAR VIEW MIRROR ASSEMBLY LH
Check the operation of the mirror surface.
Note:If the mirror surface is fully turned to the right, left, upward or downward position, the motor slips and produces a clicking noise. This is not a malfunction.
-
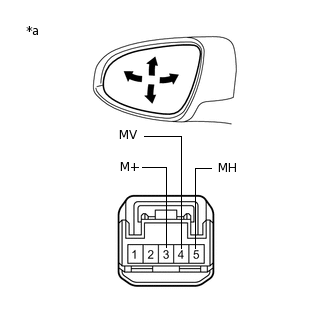
*a
Component without harness connected
(Outer Rear View Mirror Assembly LH)
Disconnect the outer rear view mirror assembly LH connector.
Apply battery voltage and check the operation of the mirror surface.
OK
Battery Connection
Specified Condition
Battery positive (+) → Terminal 4 (MV)
Battery negative (-) → Terminal 3 (M+)
Turns upward
Battery positive (+) → Terminal 3 (M+)
Battery negative (-) → Terminal 4 (MV)
Turns downward
Battery positive (+) → Terminal 5 (MH)
Battery negative (-) → Terminal 3 (M+)
Turns right
Battery positive (+) → Terminal 3 (M+)
Battery negative (-) → Terminal 5 (MH)
Turns left
If the result is not as specified, replace the outer rear view mirror assembly LH.
-
Check the operation of the mirror heater.
-
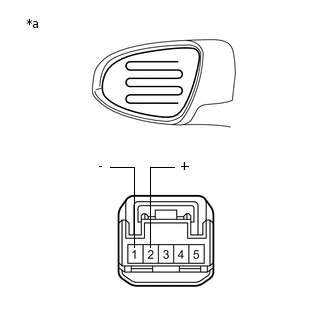
*a
Component without harness connected
(Outer Rear View Mirror Assembly LH)
Disconnect the outer rear view mirror assembly LH connector.
Measure the resistance according to the value(s) in the table below.
Standard Resistance
Tester Connection
Condition
Specified Condition
2 (+) - 1 (-)
25°C (77°F)
3.57 to 4.83 Ω
If the result is not as specified, replace the outer rear view mirror assembly LH.
Connect a cable from the positive (+) battery terminal to terminal 2 and the negative (-) battery terminal to terminal 1, then check that the mirror becomes warm.
Tip:It takes a short time for the mirror to become warm.
OK
Mirror becomes warm.
If the result is not as specified, replace the outer rear view mirror assembly LH.
-