LUGGAGE COMPARTMENT DOOR OUTSIDE GARNISH INSTALLATION
PROCEDURE
INSTALL NO. 2 LUGGAGE COMPARTMENT DOOR OUTSIDE GARNISH (for Type B)
Engage the 4 guides and 4 claws.
Install the No. 2 luggage compartment door outside garnish with the 2 screws.
INSTALL NO. 2 BACK DOOR GARNISH RETAINER (for Type B)
w/o Rear View Monitor System:
Engage the 2 claws to install the No. 2 back door garnish retainer.
INSTALL LUGGAGE COMPARTMENT DOOR OUTSIDE GARNISH PROTECTOR
Clean the luggage compartment door outside garnish.
Remove any remaining double-sided tape from the luggage compartment door outside garnish.
Wipe off any tape adhesive residue with cleaner.
Remove the release paper from a new luggage compartment door outside garnish protector.
Tip:After removing the release paper, keep the exposed adhesive free from foreign matter.
Install the luggage compartment door outside garnish protector as shown in the illustration.
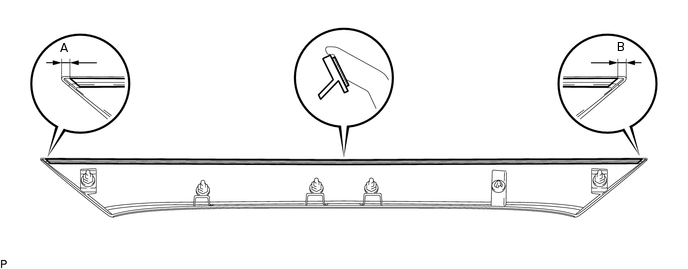
Standard Measurement
Area
Measurement
Area
Measurement
A
4.5 to 5.5 mm (0.177 to 0.217 in.)
B
3.0 to 9.0 mm (0.118 to 0.354 in.)
INSTALL LUGGAGE COMPARTMENT DOOR OPENING SWITCH ASSEMBLY
Install the luggage compartment door opening switch assembly.
INSTALL LUGGAGE COMPARTMENT DOOR OUTSIDE GARNISH SUB-ASSEMBLY
w/ Gasket:
Install 5 new gaskets to the luggage compartment door outside garnish sub-assembly.
Install a new clip to the luggage compartment door outside garnish sub-assembly.
Engage the clip.
Install the luggage compartment door outside garnish sub-assembly with the 5 nuts.
Connect the connector.
INSTALL REAR LIGHT ASSEMBLY LH
INSTALL REAR LIGHT ASSEMBLY RH
Tip:Use the same procedure as for the LH side.