FUEL TANK REMOVAL
PROCEDURE
-
REMOVE FUEL SUCTION TUBE WITH PUMP AND GAUGE ASSEMBLY
-
REMOVE FUEL TANK VENT TUBE ASSEMBLY
-
DRAIN FUEL
-
REMOVE PROPELLER SHAFT WITH CENTER BEARING ASSEMBLY
-
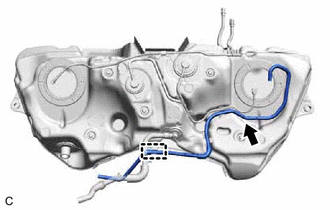
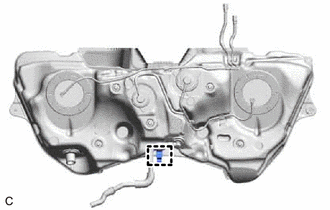
DISCONNECT FUEL TANK MAIN TUBE SUB-ASSEMBLY
Note
Remove any foreign matter on the fuel tube connector and fuel pipe before performing this work.
-
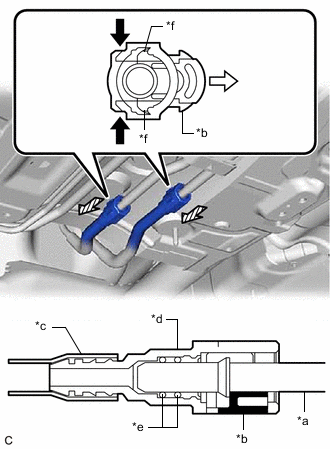
*a Fuel Pipe *b Retainer *c Nylon Tube *d Fuel Tube Connector *e O-ring *f Claw 
Push 
Pull out 
Pull off Disconnect the fuel tank main tube sub-assembly from the fuel pipe.
-
Disengage the 2 claws of the retainer. Pull out the retainer and disconnect the fuel tube connector from the fuel pipe.
Note
Be sure to disconnect the fuel tube connector by hand.
-
If the fuel tube connector and fuel pipe are stuck, push and pull the fuel tube connector to release it. Pull the fuel tube connector off of the fuel pipe carefully.
Note
-
Be sure to disconnect the fuel tube connector by hand.
-
Do not scratch or allow any foreign matter to get on the parts when disconnecting them as the fuel tube connector has O-rings that seal the pipe (fuel pipe).
-
Do not bend, twist, pinch or kink the nylon tube.
-
-
Check that there is no foreign matter on the sealing surfaces of the disconnected fuel lines. Clean them if necessary.
-
Cover the disconnected fuel pipe and fuel tube connector with plastic bags to prevent damage and contamination.
-
-
-
DISCONNECT NO. 1 FUEL EVAPORATION TUBE SUB-ASSEMBLY
Note
Remove any foreign matter on the fuel tube connector and fuel pipe before performing this work.
-
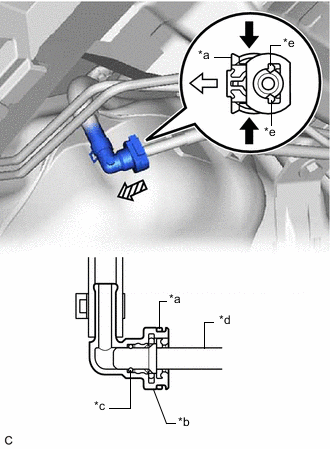
*a Retainer *b Fuel Tube Connector *c O-ring *d Fuel Pipe *e Claw Push Pull out Pull off Remove the No. 1 fuel evaporation tube sub-assembly from the fuel pipe.
-
Disengage the 2 claws of the retainer. Pull out the retainer and disconnect the fuel tube connector from the fuel pipe.
Note
Be sure to disconnect the fuel tube connector by hand.
-
If the fuel tube connector and fuel pipe are stuck, push and pull the fuel tube connector to release it. Pull the fuel tube connector off of the fuel pipe carefully.
Note
-
Be sure to disconnect the fuel tube connector by hand.
-
Do not scratch or allow any foreign matter to get on the parts when disconnecting them as the fuel tube connector has an O-ring that seals the pipe (fuel pipe).
-
-
Check that there is no foreign matter on the sealing surfaces of the disconnected fuel lines. Clean them if necessary.
-
Cover the disconnected fuel pipe and fuel tube connector with plastic bags to prevent damage and contamination.
-
-
-
DISCONNECT FUEL TANK TO FILLER PIPE HOSE
-
Loosen the clamp, then disconnect the fuel tank to filler pipe hose from the fuel tank assembly.
-
-
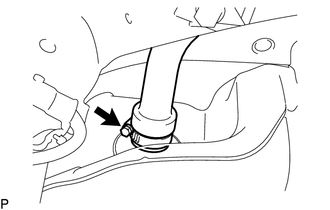
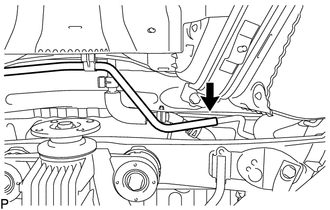
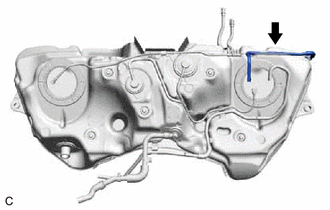
DISCONNECT FUEL TANK BREATHER TUBE
-
Loosen the clamp and disconnect the fuel tank breather tube from the fuel tank breather tube connector.
-
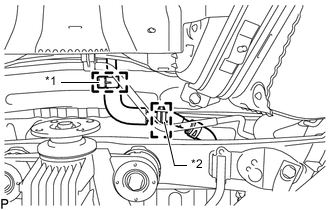
*1 Breather Tube Clamp *2 No. 2 Evaporation Vent Tube Clamp Disengage the 2 clamps to disconnect the fuel tank breather tube from the breather tube clamp and No. 2 evaporation vent tube clamp.
-
-
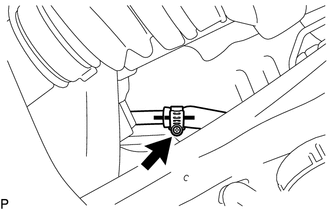
DISCONNECT CHARCOAL CANISTER OUTLET HOSE
-
Disconnect the charcoal canister outlet hose from the No. 6 fuel tank breather tube.
-
-
SEPARATE PARKING BRAKE CABLE ASSEMBLY
-
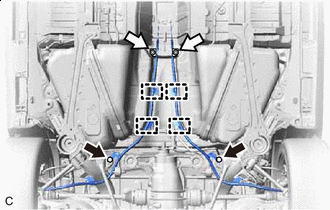
Bolt Nut Disengage the 4 clamps.
-
Remove the 2 bolts and 2 nuts, and separate the No. 2 parking brake cable assembly and No. 3 parking brake cable assembly.
-
-
REMOVE REAR BODY MOUNTING CUSHION SUB-ASSEMBLY LH
-
REMOVE REAR BODY MOUNTING CUSHION SUB-ASSEMBLY RH
-
REMOVE FUEL TANK ASSEMBLY
-

Bolt Nut Support the fuel tank assembly using an engine lifter.
Tech Tips
Using height adjustment attachments and plate lift attachments, keep the fuel tank assembly horizontal.
-
Remove the 2 nuts, 4 bolts and 2 No. 1 fuel tank band sub-assemblies.
-
Lower the engine lifter to remove the fuel tank assembly.
Note
-
Slowly operate the engine lifter to lower the fuel tank assembly.
-
Be careful not to drop the fuel tank assembly.
-
When removing the fuel tank assembly, tilt it slightly to prevent it from interfering with the suspension arm or other surrounding parts.
-
-
-
REMOVE NO. 1 FUEL EVAPORATION TUBE SUB-ASSEMBLY
-
Remove the No. 1 fuel evaporation tube sub-assembly from the fuel tank assembly.
-
-
REMOVE CHARCOAL CANISTER OUTLET HOSE
-
Disengage the clamp to remove the charcoal canister outlet hose from the fuel tank assembly.
-
Disengage the clamp to remove the No. 4 fuel tube clamp from the fuel tank assembly.
-
-
REMOVE FUEL TANK MAIN TUBE SUB-ASSEMBLY
-
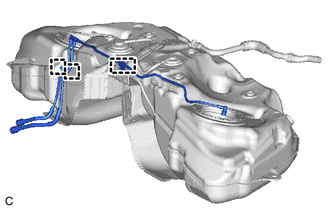
Disengage the 3 clamps to remove the fuel tank main tube sub-assembly from the fuel tank assembly.
-
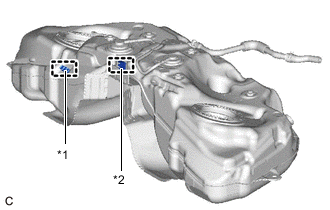
*1 No. 3 Fuel Tube Clamp *2 No. 5 Fuel Tube Clamp Disengage the 2 clamps to remove the No. 3 fuel tube clamp and No. 5 fuel tube clamp from the fuel tank assembly.
-
-
REMOVE FUEL TANK CUSHION
-
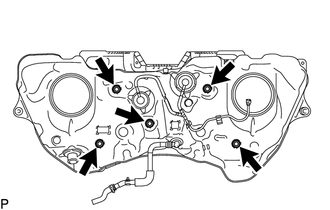
Remove the 5 No. 6 fuel tank cushions from the fuel tank assembly.
-
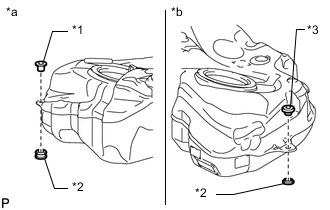
*1 Fuel Tank Bracket *2 Fuel Tank Cushion *3 Fuel Tank Cushion Set *a RH side *b LH side Remove the fuel tank bracket, 2 fuel tank cushions and fuel tank cushion set from the fuel tank assembly.
-
-
REMOVE FUEL TANK PROTECTOR SUB-ASSEMBLY
-
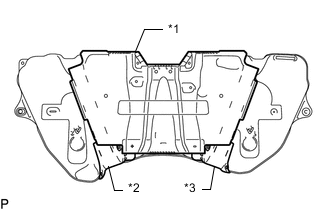
*1 No. 1 Fuel Tank Protector Sub-assembly *2 No. 2 Fuel Tank Protector *3 No. 3 Fuel Tank Protector Remove the No. 1 fuel tank protector sub-assembly from the fuel tank assembly.
-
Remove the No. 2 fuel tank protector and No. 3 fuel tank protector from the fuel tank assembly.
-